

Technical SEO
Chapter 14 Of $100M SEO for startups course

Written by Jan-Oliver Seidenfuss
Technical SEO is overcomplicated.
In fact, only two technical SEO initiatives drive impact.
In this guide, we’ll learn
So if you want to rank higher with less work, you'll love this guide.
Technical SEO is overcomplicated.
In fact, only two technical SEO initiatives drive impact.
In this guide, we’ll learn
So if you want to rank higher with less work, you'll love this guide.
Technical SEO is overcomplicated.
In fact, only two technical SEO initiatives drive impact.
In this guide, we’ll learn
So if you want to rank higher with less work, you'll love this guide.
About this Course
Course Chapters

Course Chapters
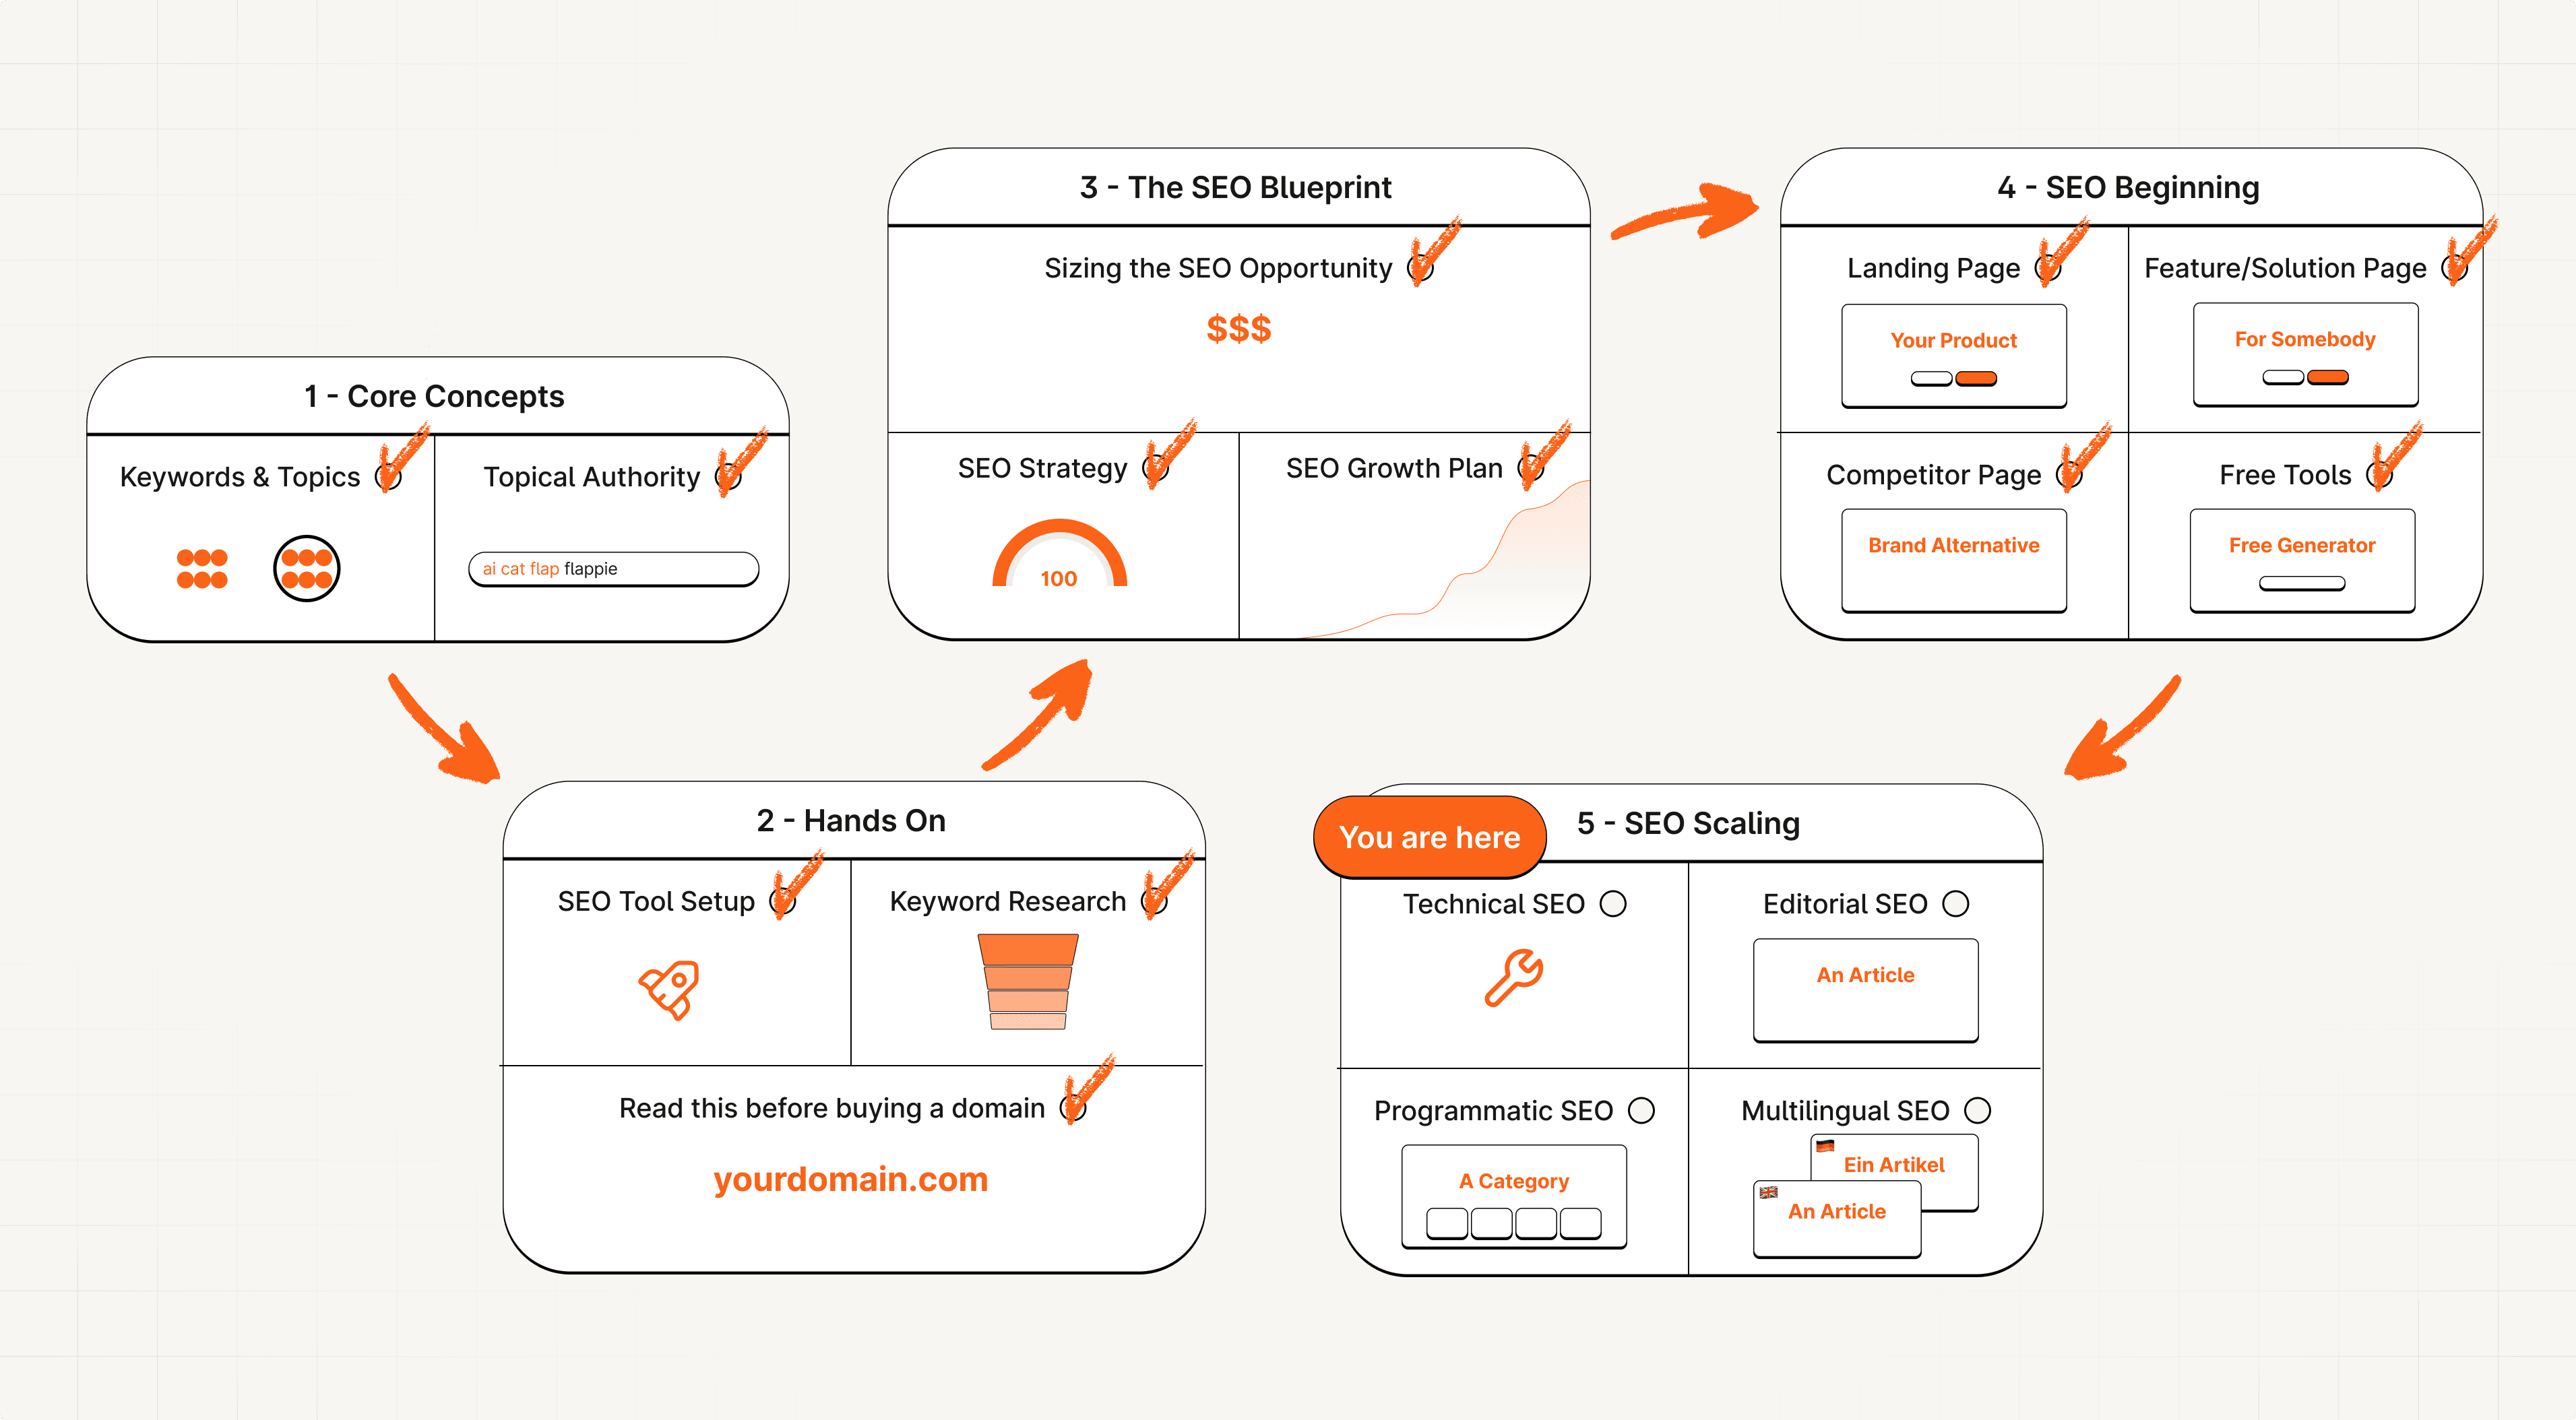
This is chapter 13 of our SEO for Startups course.
If you aren't following along, don't worry.
I'm linking to the individual subchapters throughout the content. So if something is unclear you can always go there, quickly read up on it and come back.
Enjoy!
This is chapter 13 of our SEO for Startups course.
If you aren't following along, don't worry.
I'm linking to the individual subchapters throughout the content. So if something is unclear you can always go there, quickly read up on it and come back.
Enjoy!
This is chapter 13 of our SEO for Startups course.
If you aren't following along, don't worry.
I'm linking to the individual subchapters throughout the content. So if something is unclear you can always go there, quickly read up on it and come back.
Enjoy!
How Google works
Let’s understand how Google actually works.
Step #1 - Crawling
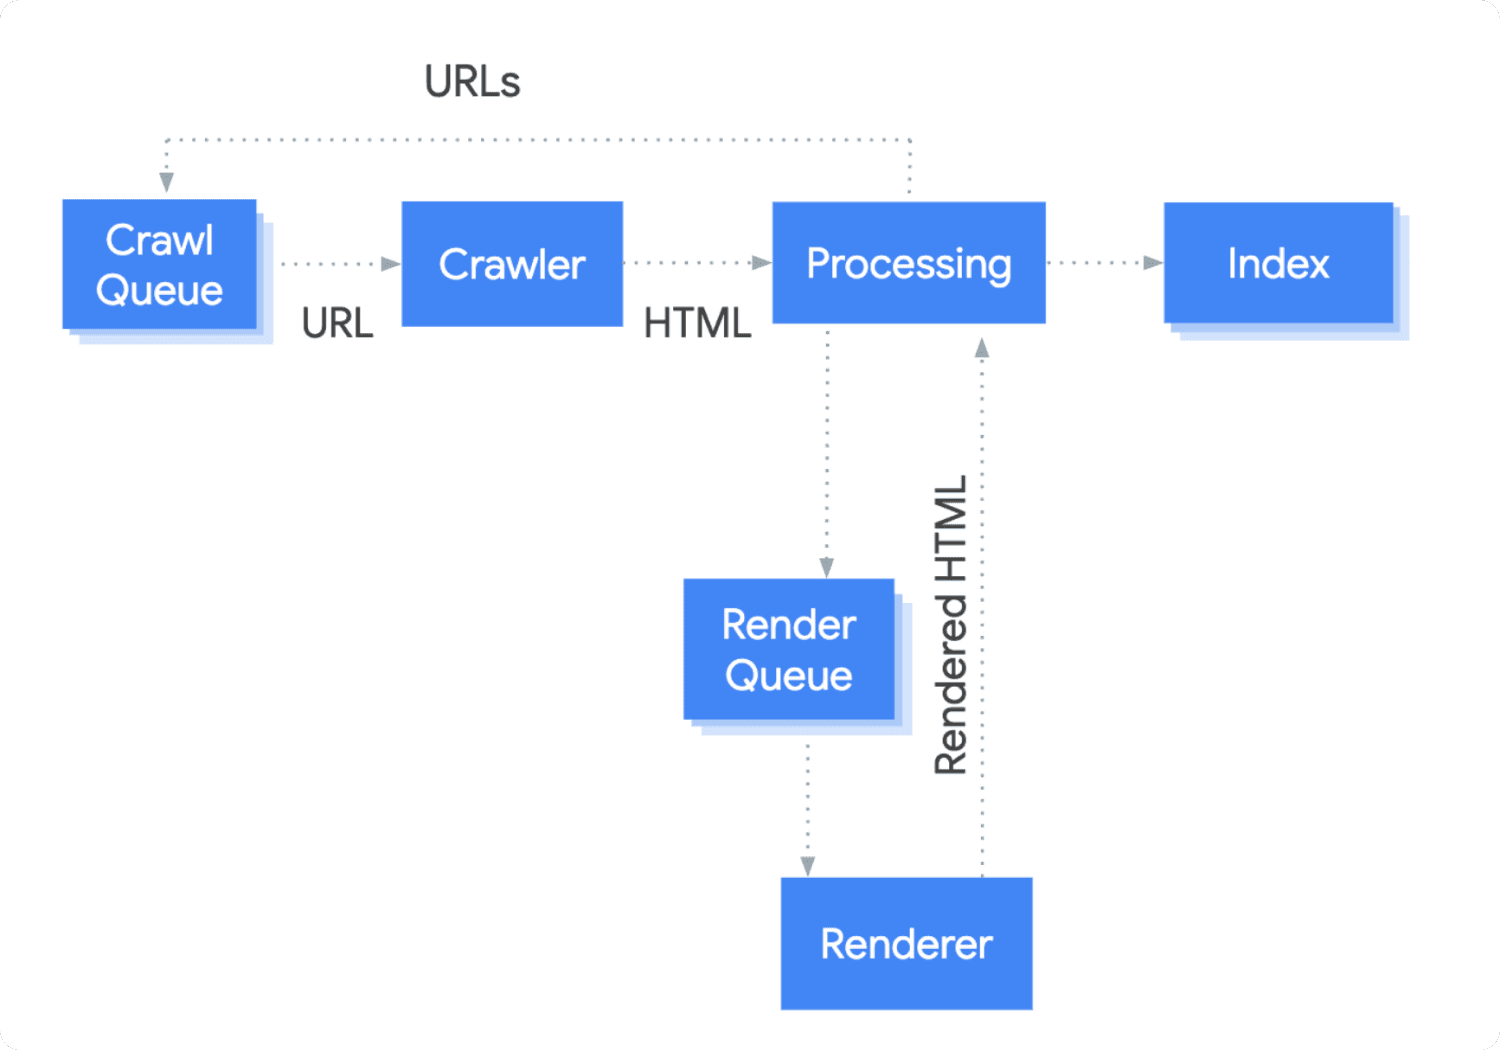
The thing is, there is no central registry of “the internet”. For Google to know which pages exist, it has to find them.
That’s where the Googlebot comes into play.
The Googlebot constantly scrapes the internet to find new urls. New urls are added to the Crawl Queue.
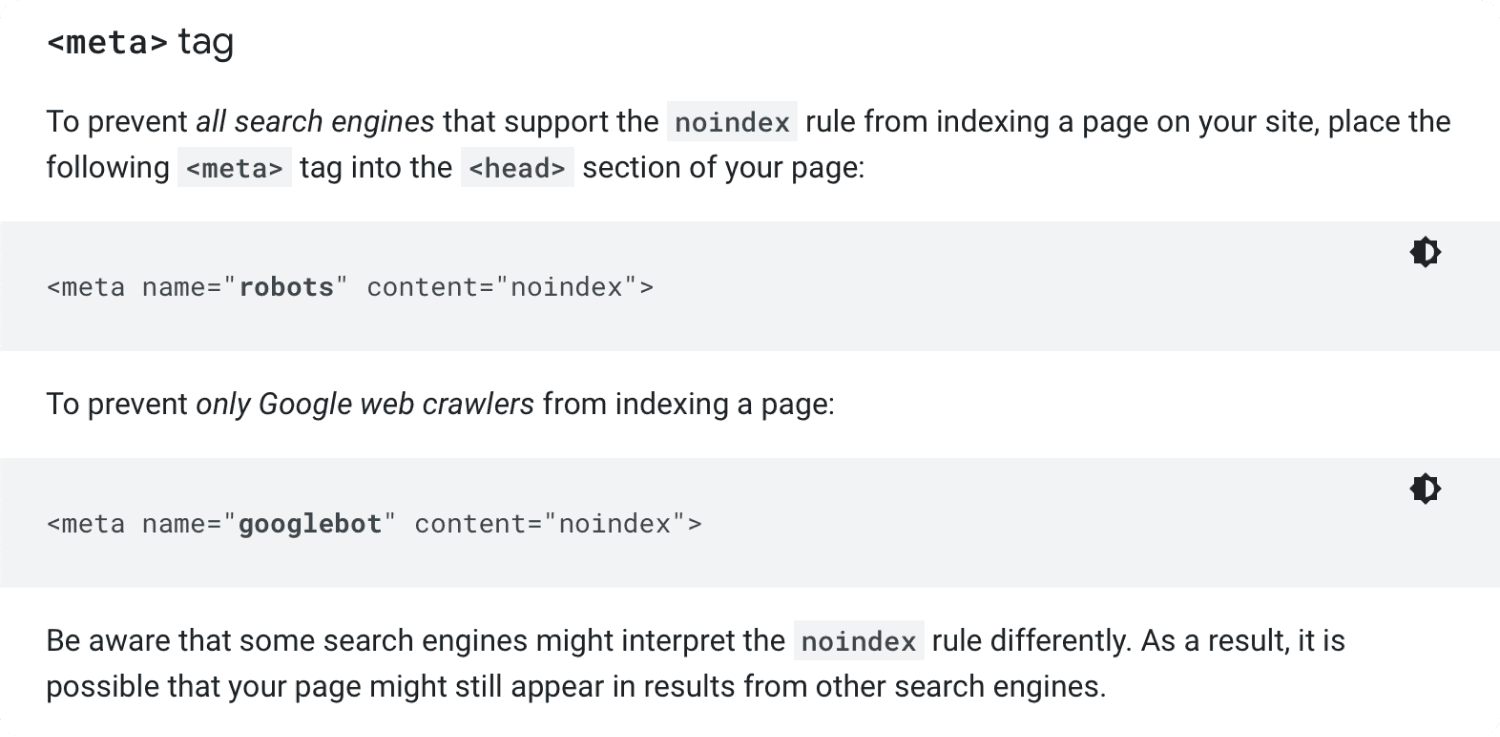
When it’s time for the url to be processed, the Googlebot will first check if you allow indexing.
You can prevent indexing of a page using a no-index meta tag. But more on that later.
If you allow crawling, the Googlebot loads the url. And gets back the page content.
But here’s the catch.
If you request a url, you sometimes only get back part/none of the content.
The missing parts of the content have to be loaded dynamically using JavaScript.
If you use a browser, this is automatically handled. Thus you never have to worry about this.
But the Googlebot does have to worry.
I know this is a bit technical.
So let me give you the most intuitive explanation there is.
When the Googlebot requests the content of a url, there are 3 options what it “sees”.
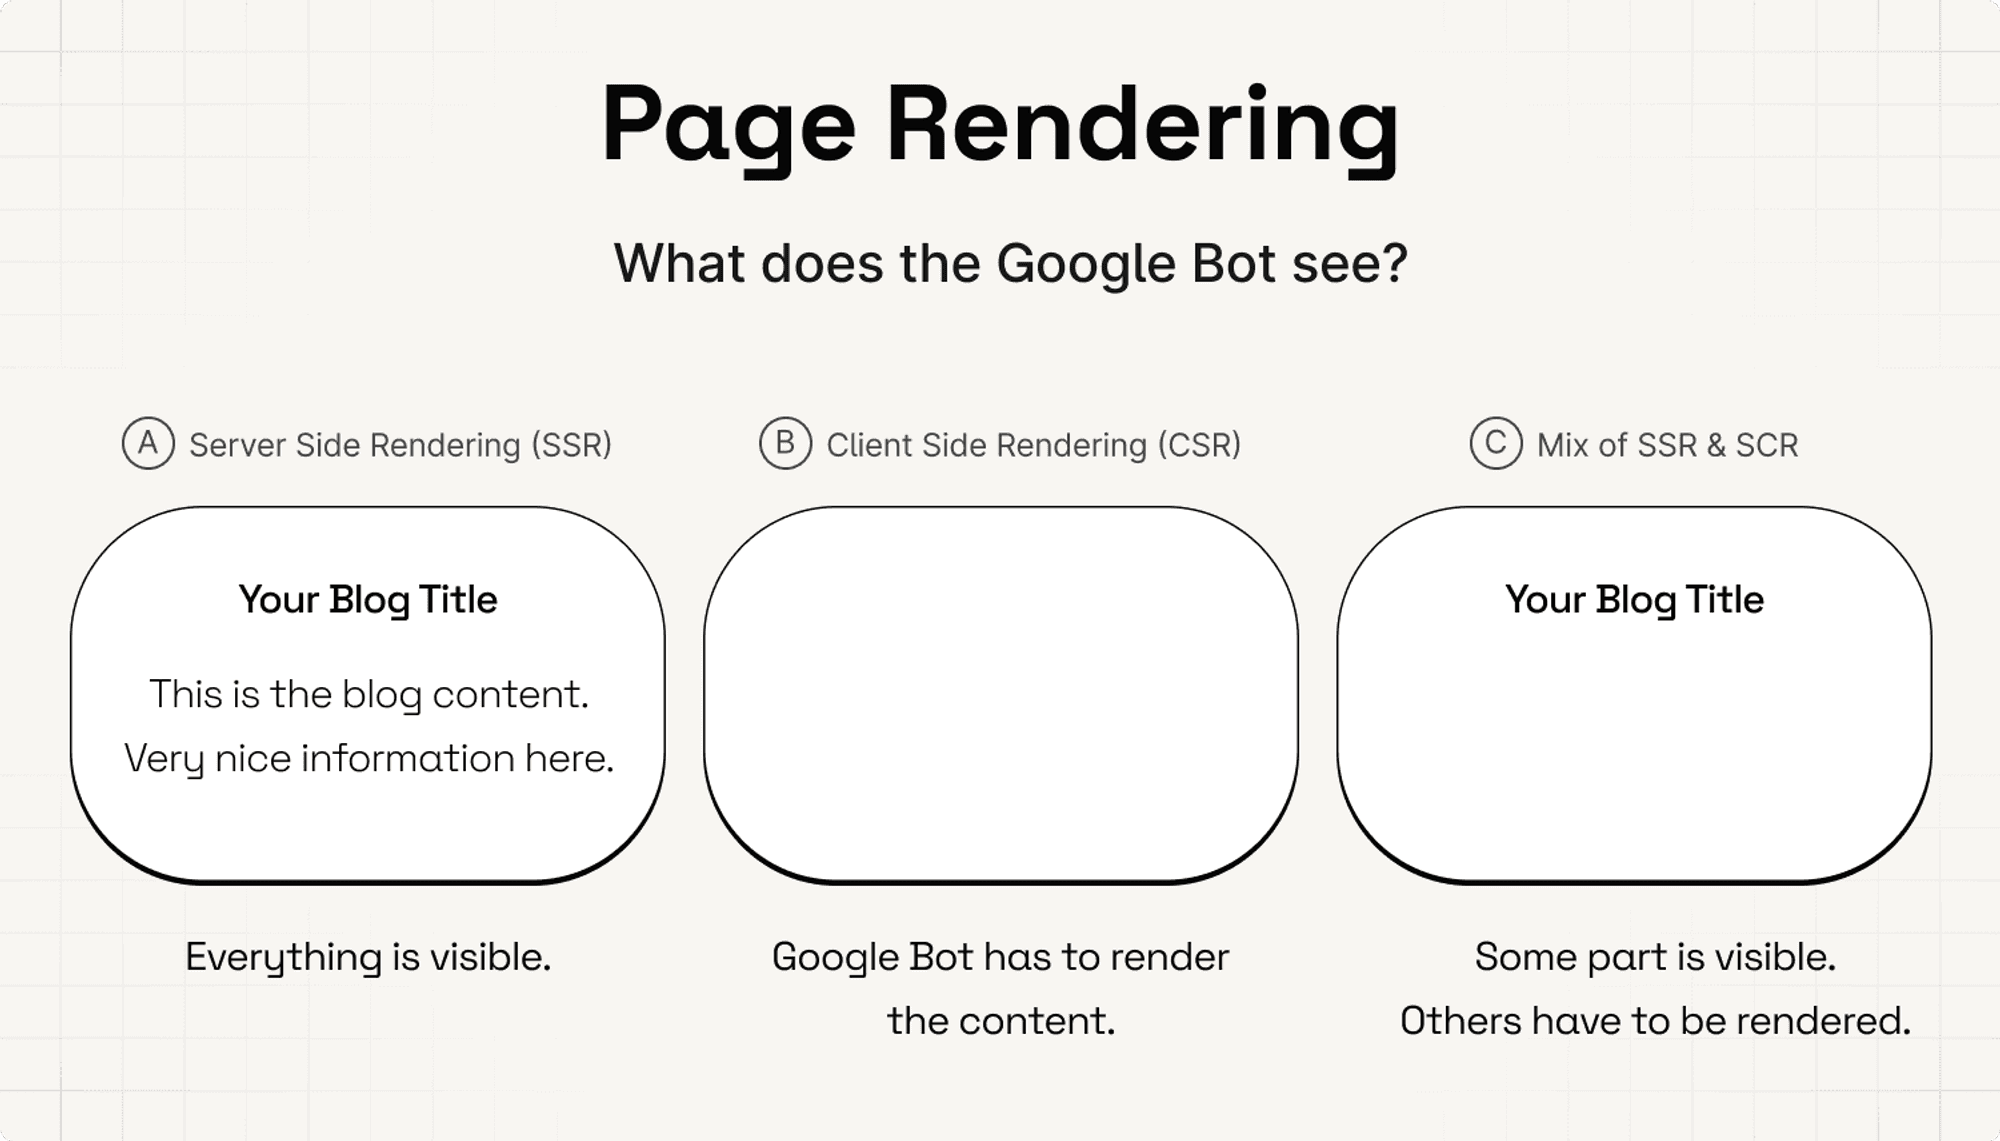
Option A is that the Google Bot sees the full page. This is called Server Side Rendering. The server where the bot requests the content from, renders the page.
Option B is that the Google Bot doesn't see anything. The bot first has to load (render) the content. This is called Client Side Rendering. Because the bot, the client, has to render the page content.
Option C is that the Google Bot sees part of the page and has to load the rest. This is a mix of Client Side & Server Side Rendering.
Most pages implement option C. Here’s Masterclass as an example.
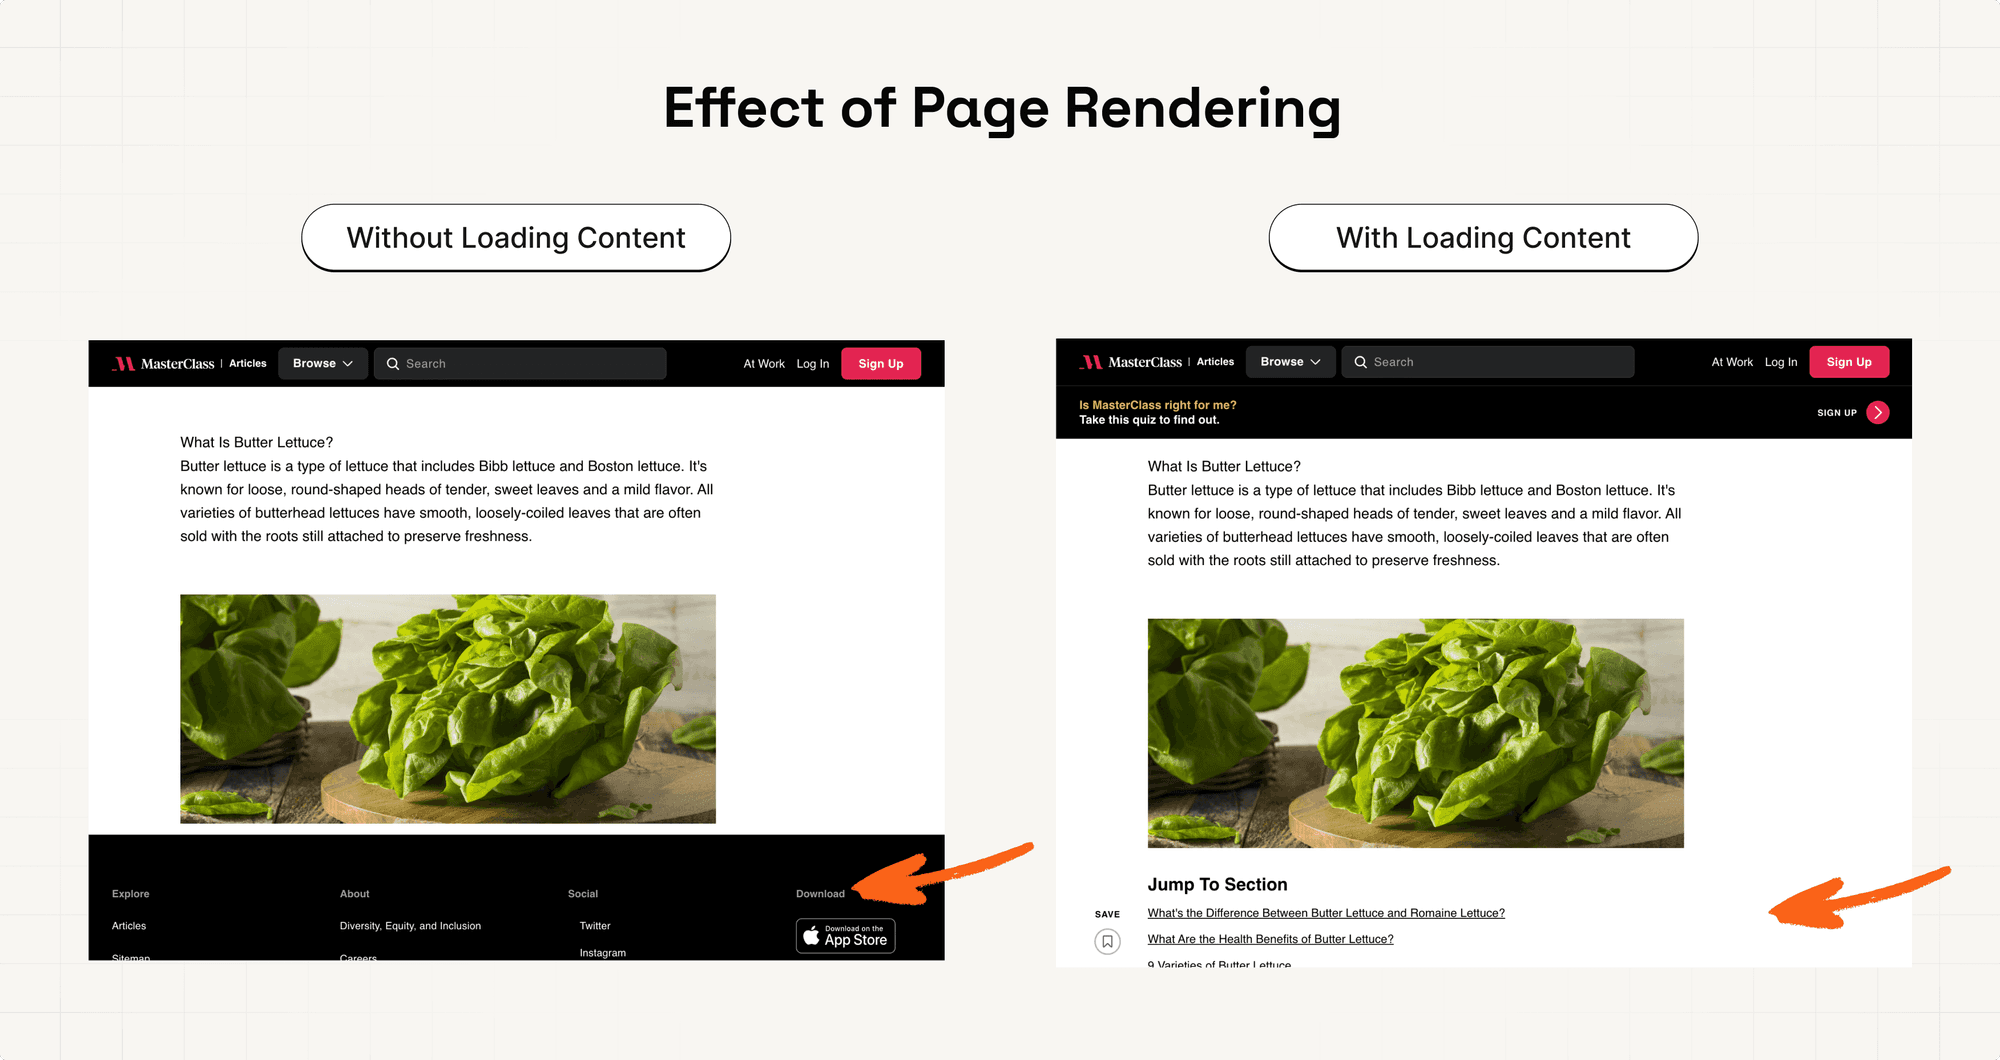
As you can see, only the introduction is directly available. The other sections (right) have to be loaded with Javascript.
This is no problem for the Googlebot. It can load the content.
But to do that, it has to render the page which is compute intensive.
Thus, the url is added to the Render Queue, rendered and can then be processed.
Nice!
Step #2 - Indexing
The page is now fully rendered.
And the Googlebot can see the page content.
Now, Google has to understand what the content is actually about.
It has to process it:
Comprehend the content by looking at keywords, meta titles, headings & more.
Find urls to new content in your page. They are added to the crawl queue unless you add a nofollow attribute.
Check if the content is duplicate or canonical. Only canonical content will be indexed.
More details on nofollow attribute and canonical tags later.
Cool!
Afterwards the page is indexed and can show up in the search results.
Step #3 - Serving Search Results
When a user searches for something, Google tries to show them content that fulfils their intent best.
For that, it uses the indexed pages & iteratively improves their selection with A/B tests and user feedback.
Let’s understand how Google actually works.
Step #1 - Crawling
The thing is, there is no central registry of “the internet”. For Google to know which pages exist, it has to find them.
That’s where the Googlebot comes into play.
The Googlebot constantly scrapes the internet to find new urls. New urls are added to the Crawl Queue.
When it’s time for the url to be processed, the Googlebot will first check if you allow indexing.
You can prevent indexing of a page using a no-index meta tag. But more on that later.
If you allow crawling, the Googlebot loads the url. And gets back the page content.
But here’s the catch.
If you request a url, you sometimes only get back part/none of the content.
The missing parts of the content have to be loaded dynamically using JavaScript.
If you use a browser, this is automatically handled. Thus you never have to worry about this.
But the Googlebot does have to worry.
I know this is a bit technical.
So let me give you the most intuitive explanation there is.
When the Googlebot requests the content of a url, there are 3 options what it “sees”.
Option A is that the Google Bot sees the full page. This is called Server Side Rendering. The server where the bot requests the content from, renders the page.
Option B is that the Google Bot doesn't see anything. The bot first has to load (render) the content. This is called Client Side Rendering. Because the bot, the client, has to render the page content.
Option C is that the Google Bot sees part of the page and has to load the rest. This is a mix of Client Side & Server Side Rendering.
Most pages implement option C. Here’s Masterclass as an example.
As you can see, only the introduction is directly available. The other sections (right) have to be loaded with Javascript.
This is no problem for the Googlebot. It can load the content.
But to do that, it has to render the page which is compute intensive.
Thus, the url is added to the Render Queue, rendered and can then be processed.
Nice!
Step #2 - Indexing
The page is now fully rendered.
And the Googlebot can see the page content.
Now, Google has to understand what the content is actually about.
It has to process it:
Comprehend the content by looking at keywords, meta titles, headings & more.
Find urls to new content in your page. They are added to the crawl queue unless you add a nofollow attribute.
Check if the content is duplicate or canonical. Only canonical content will be indexed.
More details on nofollow attribute and canonical tags later.
Cool!
Afterwards the page is indexed and can show up in the search results.
Step #3 - Serving Search Results
When a user searches for something, Google tries to show them content that fulfils their intent best.
For that, it uses the indexed pages & iteratively improves their selection with A/B tests and user feedback.
About Technical SEO
Nice, now we know how Google works.
But what exactly is technical SEO in this context?
Technical SEO refers to the optimisations made on the website and server that help search engine spiders - like the Googlebot - crawl and index your site more effectively.
And it can get complicated quickly.
A lot of small details to look out for.
But the thing is, most of these details don’t matter for higher rankings.
How do I know, you may wonder?
Well, Graphite found that only two initiatives actually drive direct ranking impact:
Internal Linking
Pages being fully indexed
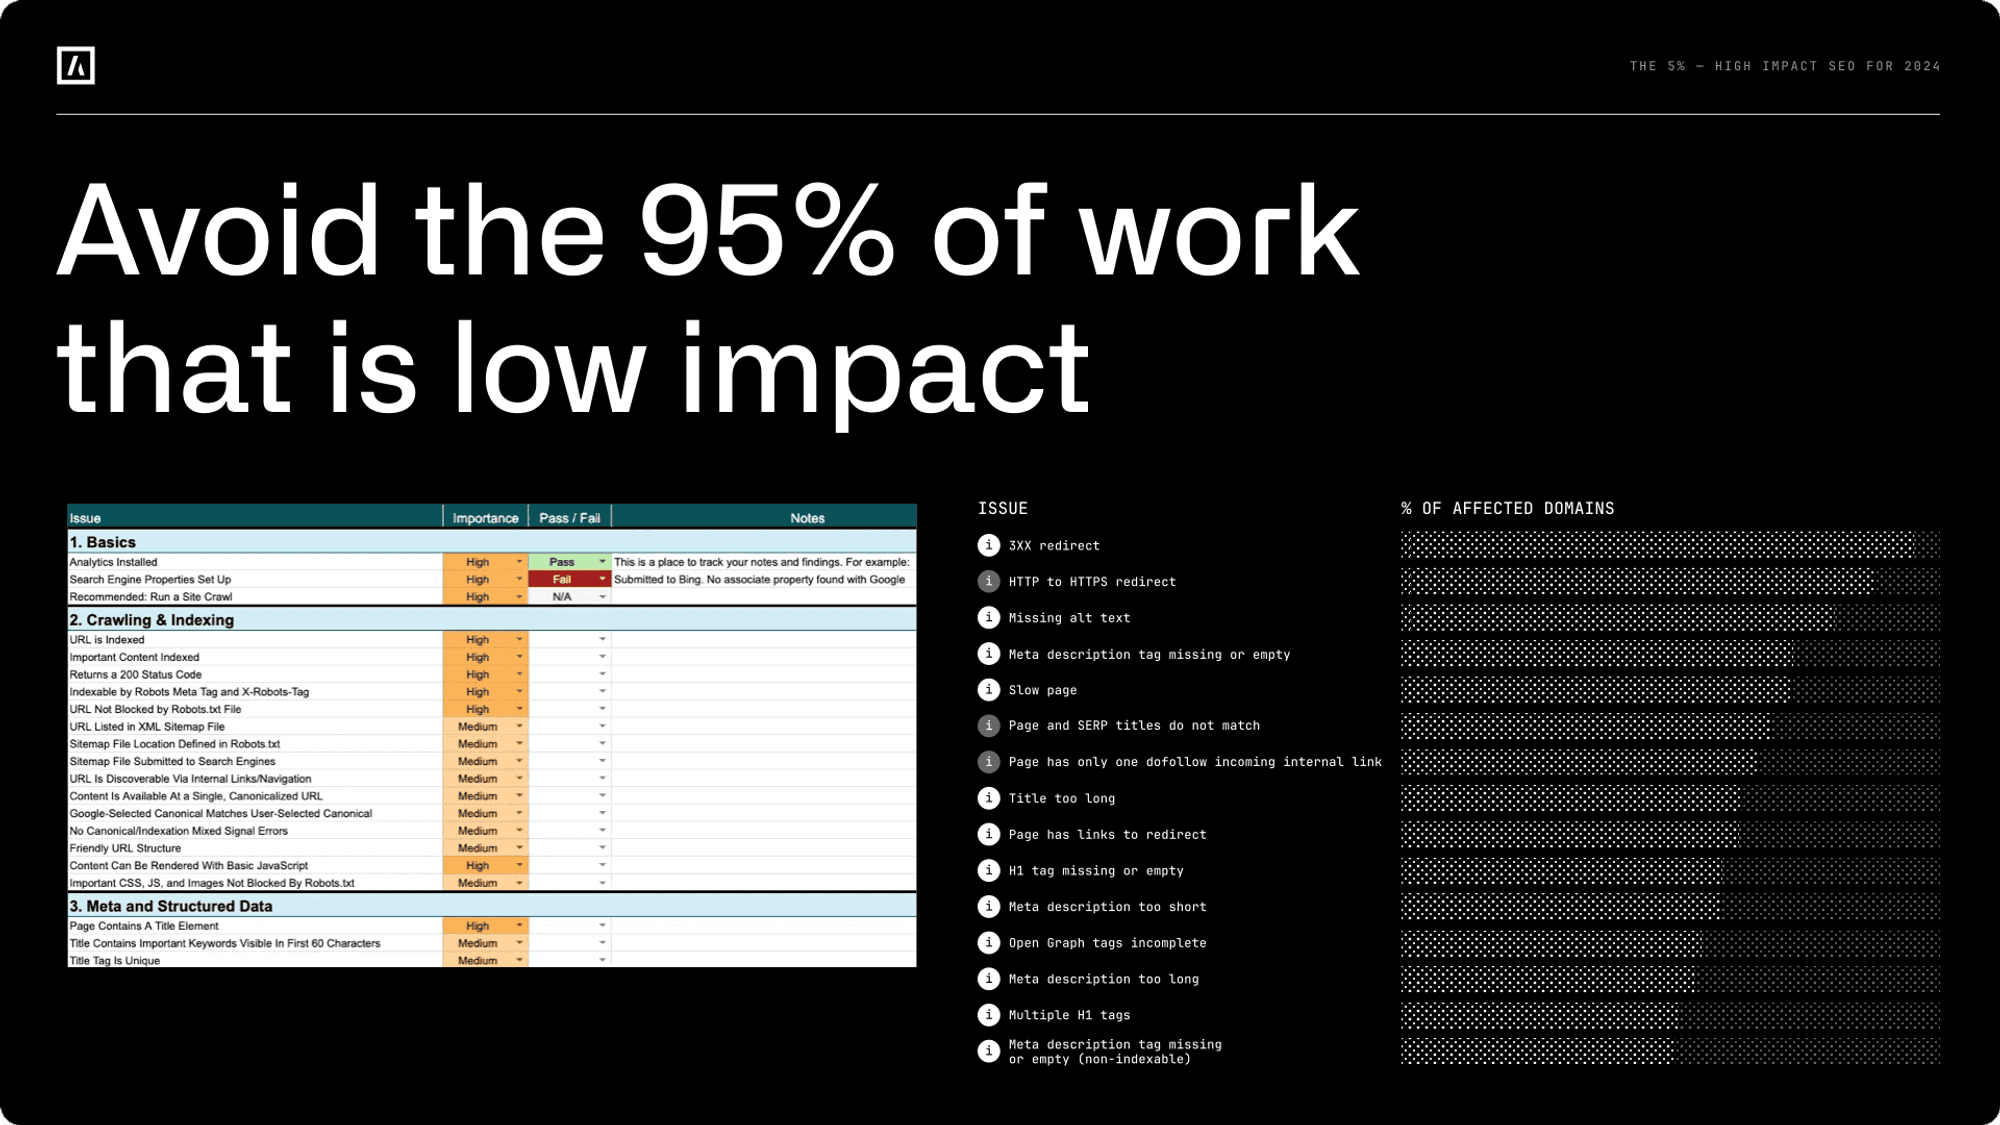
This is great news.
So let’s discuss the high impact measures first.
Then review two lower impact initiatives & finally review some other Technical SEO aspects to keep in mind.
Are you ready?
Nice, now we know how Google works.
But what exactly is technical SEO in this context?
Technical SEO refers to the optimisations made on the website and server that help search engine spiders - like the Googlebot - crawl and index your site more effectively.
And it can get complicated quickly.
A lot of small details to look out for.
But the thing is, most of these details don’t matter for higher rankings.
How do I know, you may wonder?
Well, Graphite found that only two initiatives actually drive direct ranking impact:
Internal Linking
Pages being fully indexed
This is great news.
So let’s discuss the high impact measures first.
Then review two lower impact initiatives & finally review some other Technical SEO aspects to keep in mind.
Are you ready?
High Impact Initiatives
Internal Linking
Internal Linking is the process of cross linking your own pages.
In other words, if you link from page 1 of your site to page 2, page 2 has one more ingoing internal link.
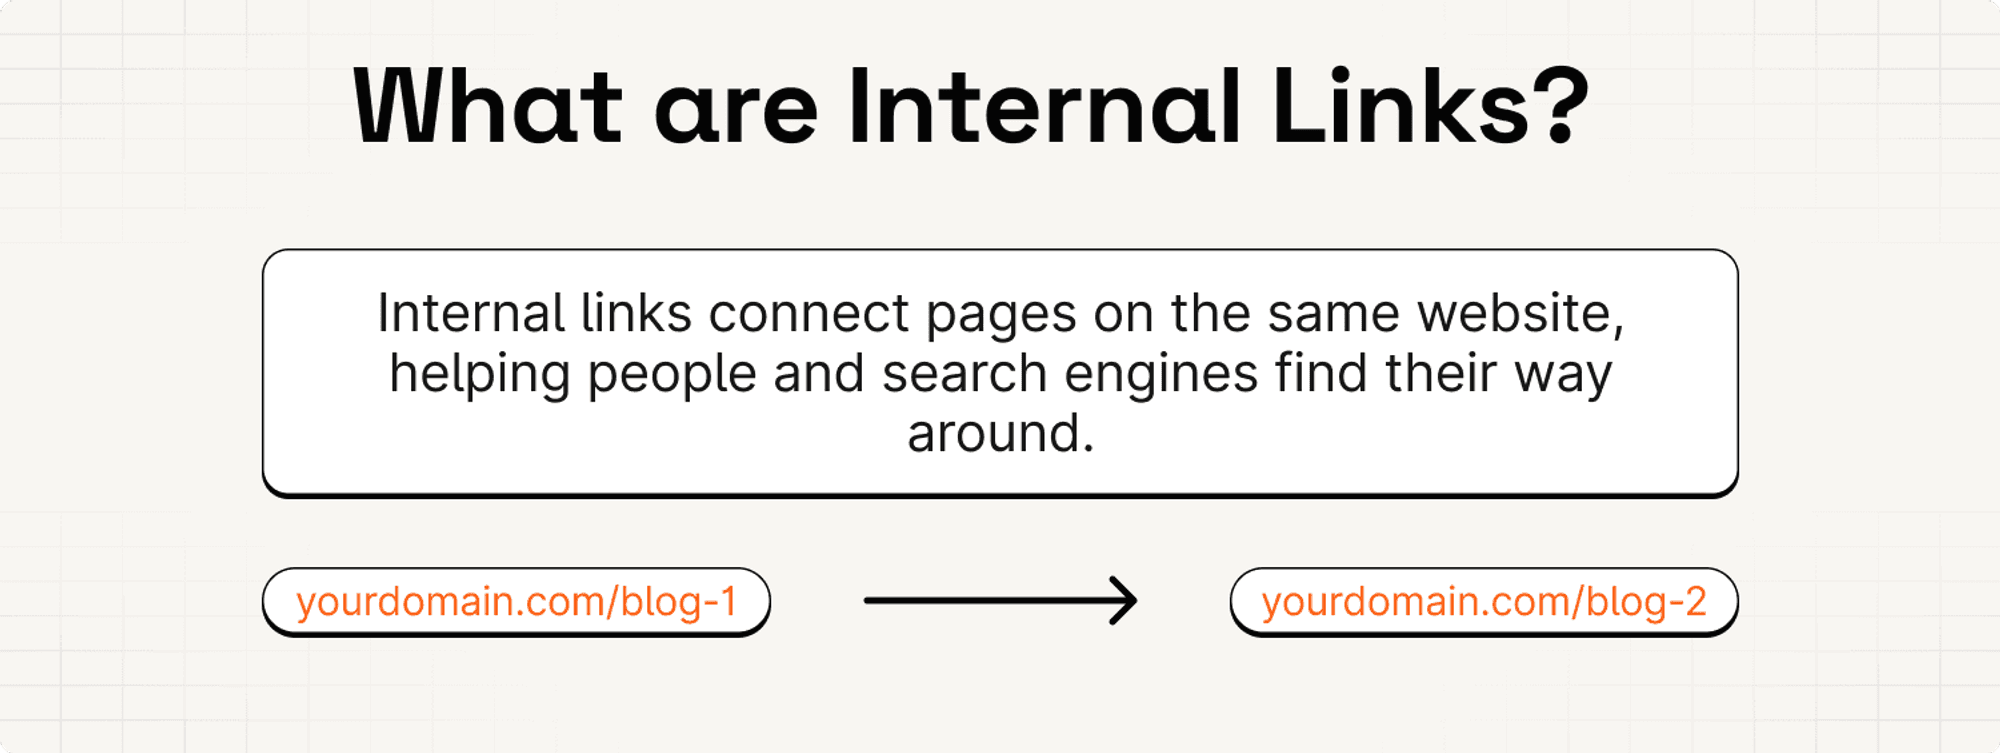
But why does this matter?
Well, Graphite found that there is a correlation between number of ingoing links and the traffic that page gets.
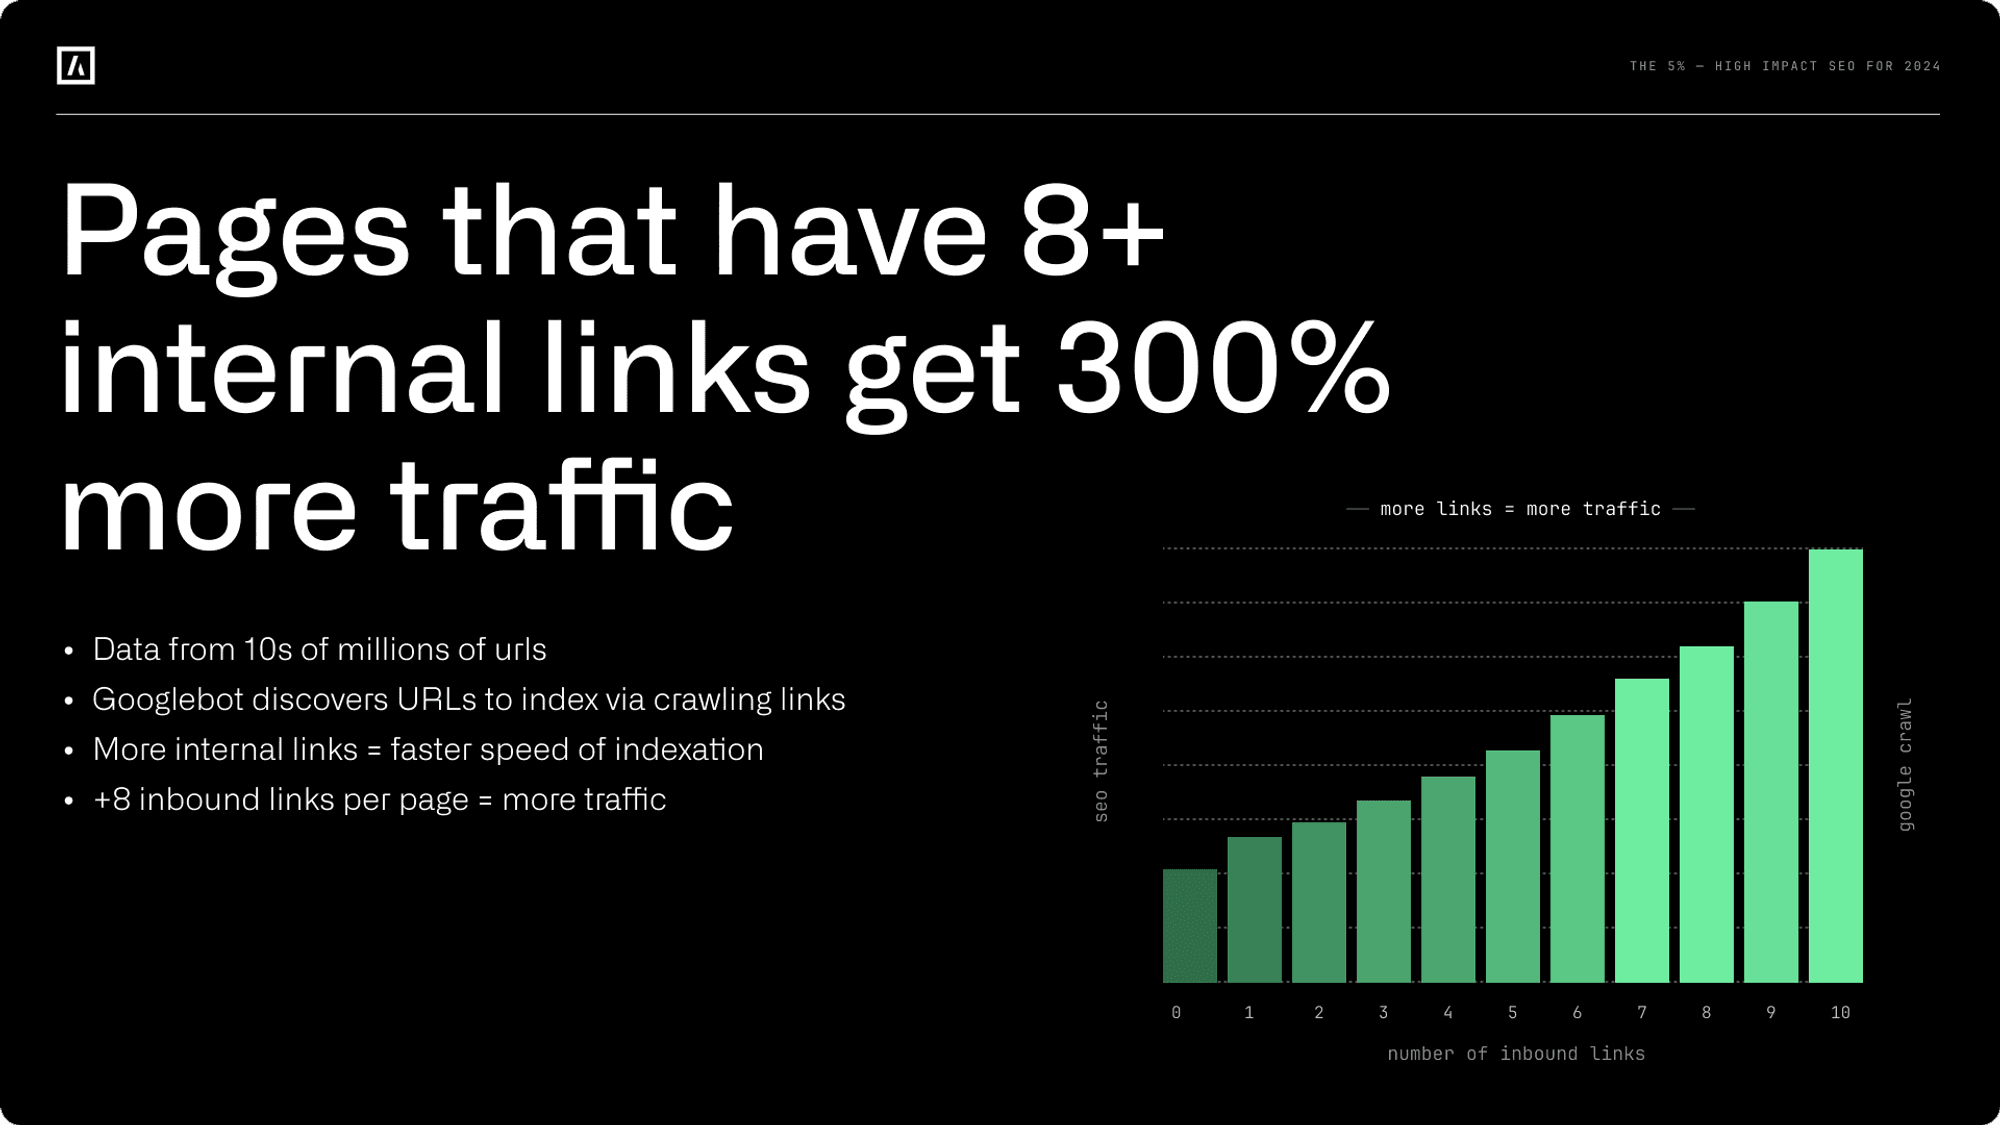
The more internal links a site has, the more frequently the Google Bot will find the page & the more traffic it gets.
Sounds unintuitive, I agree.
But it's just what the data shows. Data doesn't lie.
So what Graphite suggests is to aim for 5-10 ingoing internal links for all pages that you care about. This could be blog pages, free tools, etc.
Sounds good - but how can we implement this?
Let me show you.
First, you need to find the pages with little ingoing links (<5).
To do that, you can either use a paid tool like Screamingfrog, Ahrefs or the free Google Search Console.
The thing with Google Search Console is that it often doesn't show data for all pages.
Still, it's a great place to start.
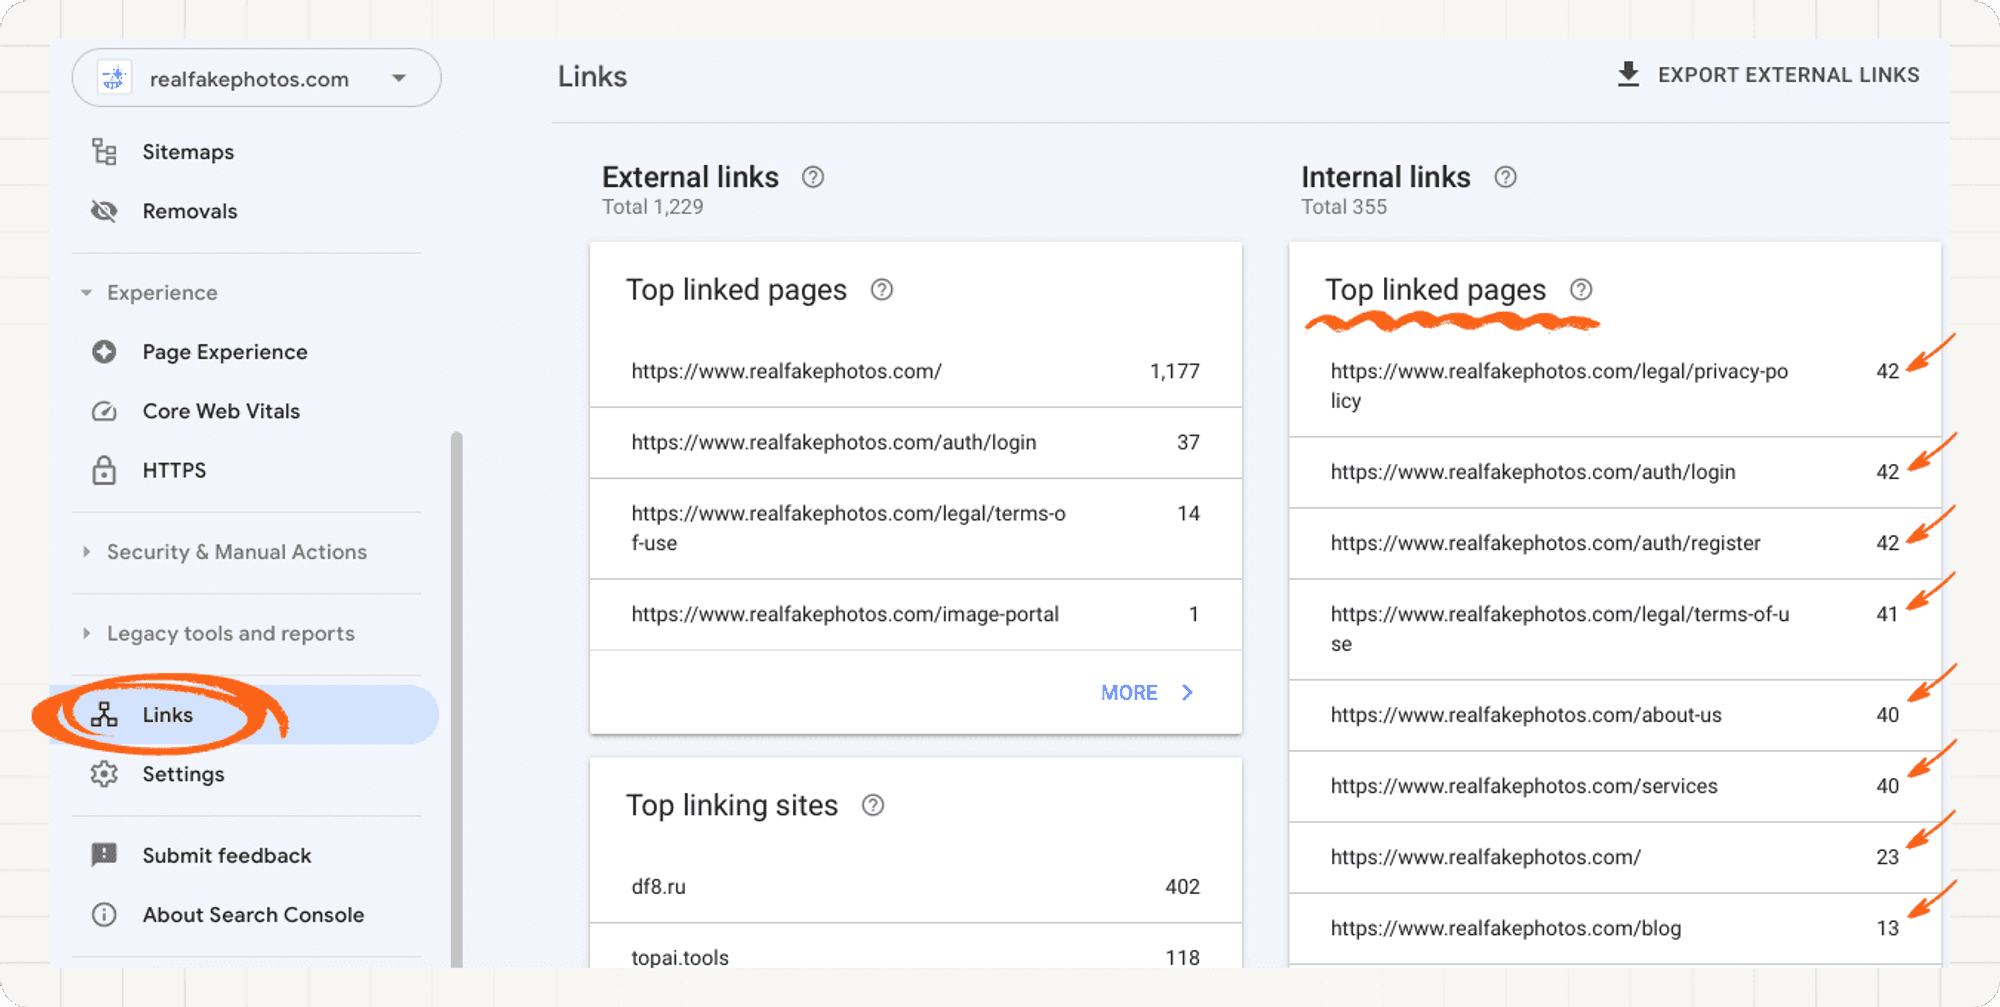
To find the internal link data, navigate to the Links section. On the right you will find the number of ingoing links for your pages.
Next, find the pages with little ingoing links (less than 5).
Then add links from other places of your website to these pages.
Which pages you connect is not super important. It just has to make sense for the user.
Let me give you an example.
Let’s say, I want to increase the number of ingoing links to one of my blog pages.
Then, you link to the blog page from within the text of other blogs. Here is an example of how this looks like.
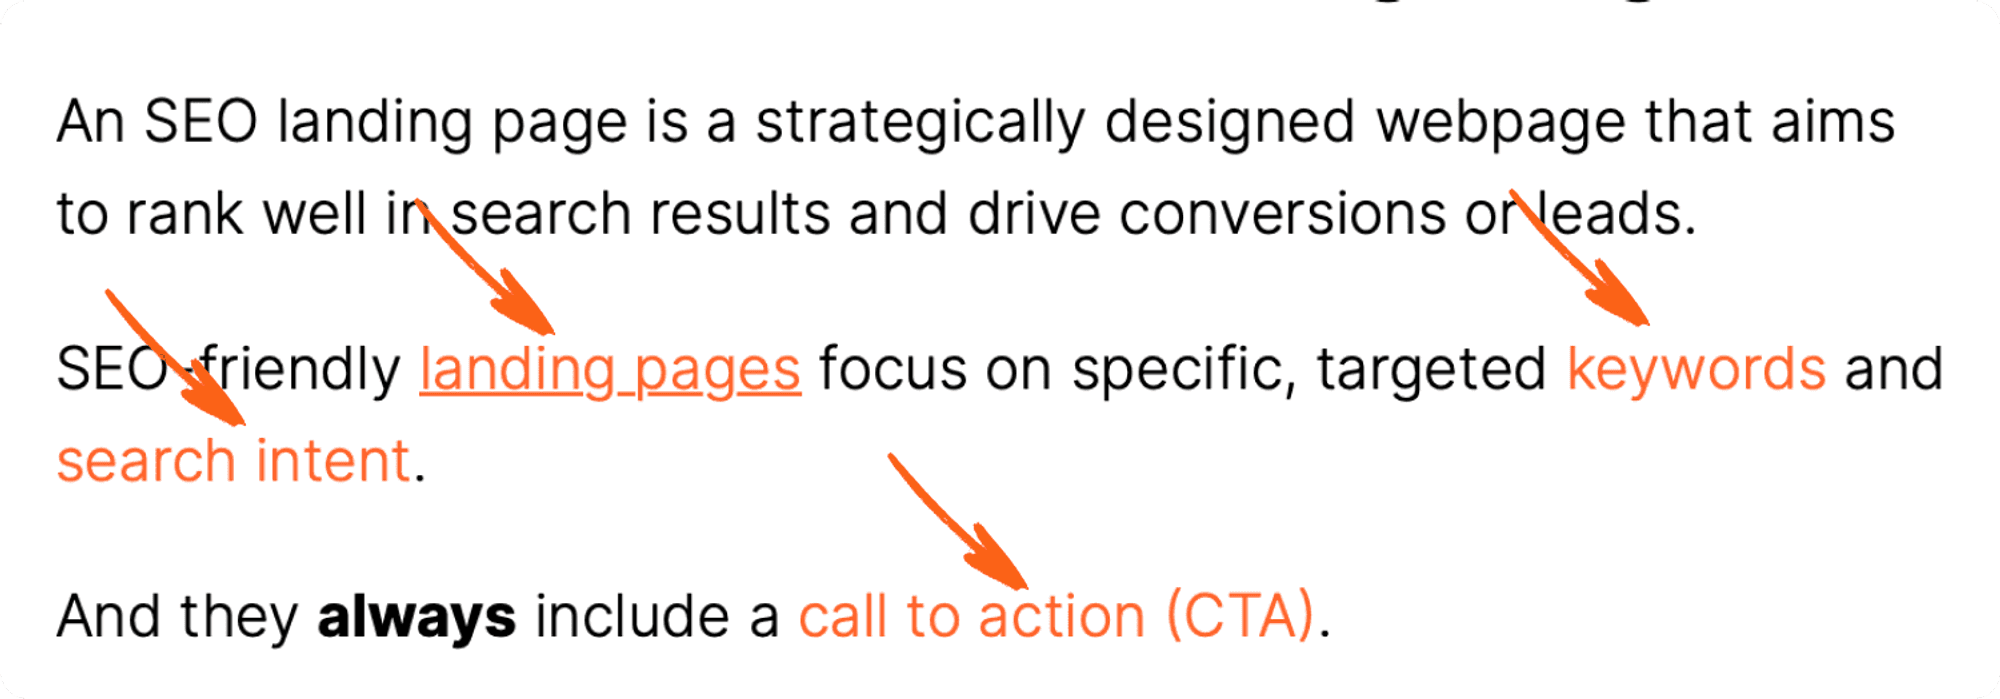
Of course, the links have to make sense. Don't just link to random things.
Another option for internal linking is the "Related Content" section at the bottom of the page.

But you could also add links from other pages like the landing page.
Nice!
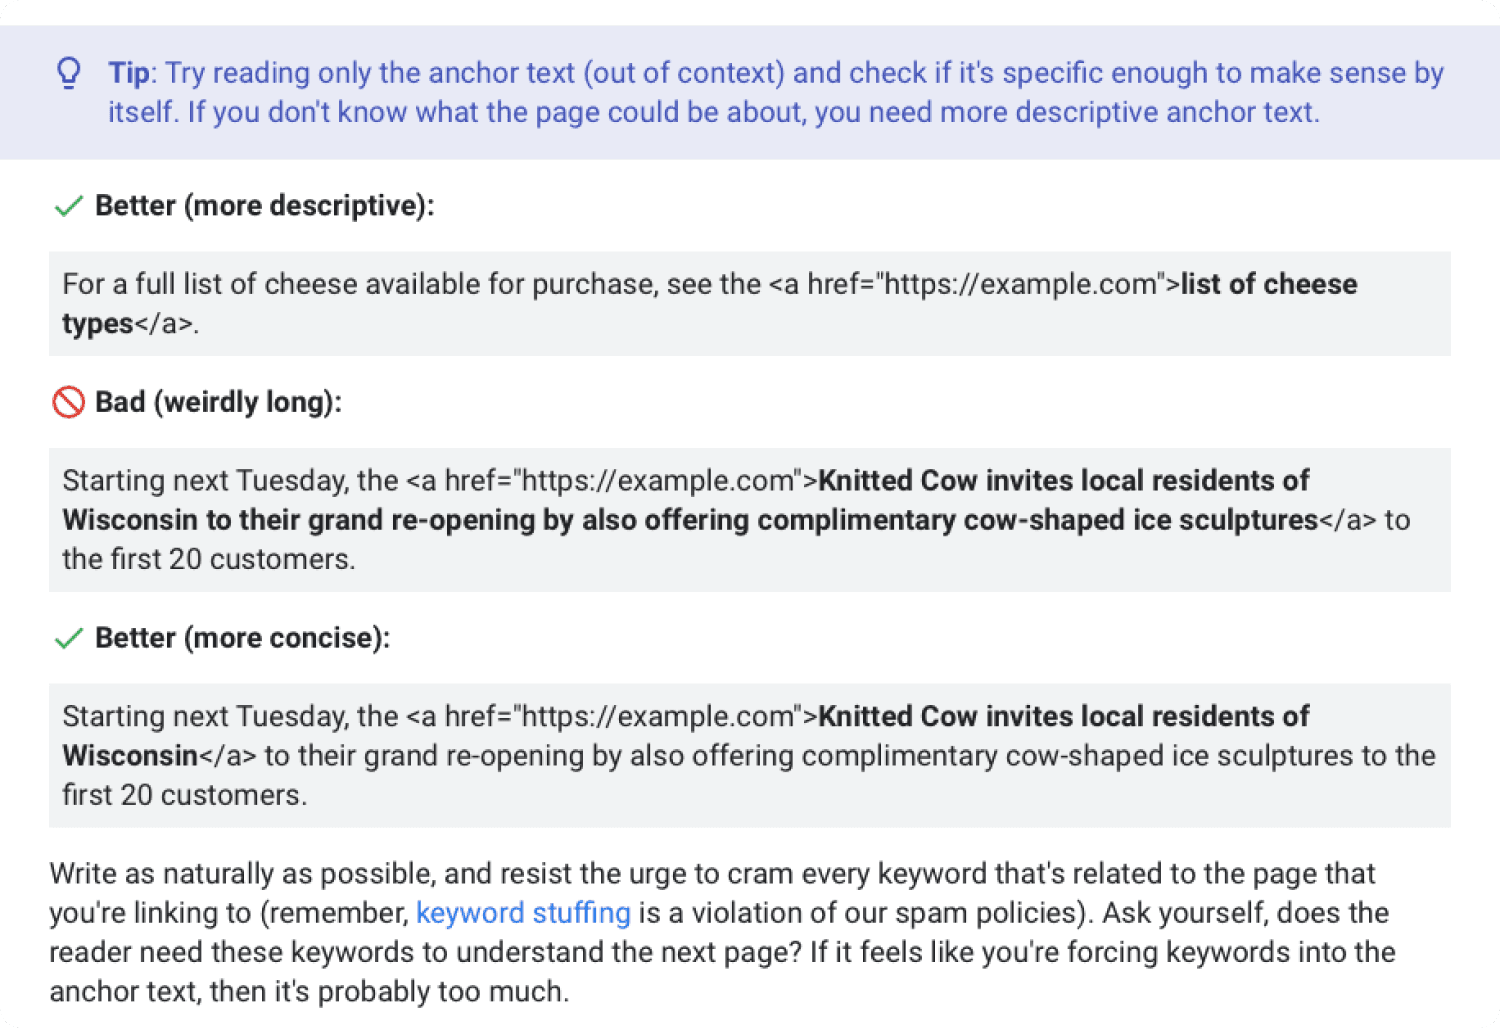
One last thing. Take a look again at the previous example.
The clickable text that has a link associated with it is called anchor text.
And it's important to use keyword rich anchor text.
Because this clearly shows Google what the content you link to is about.
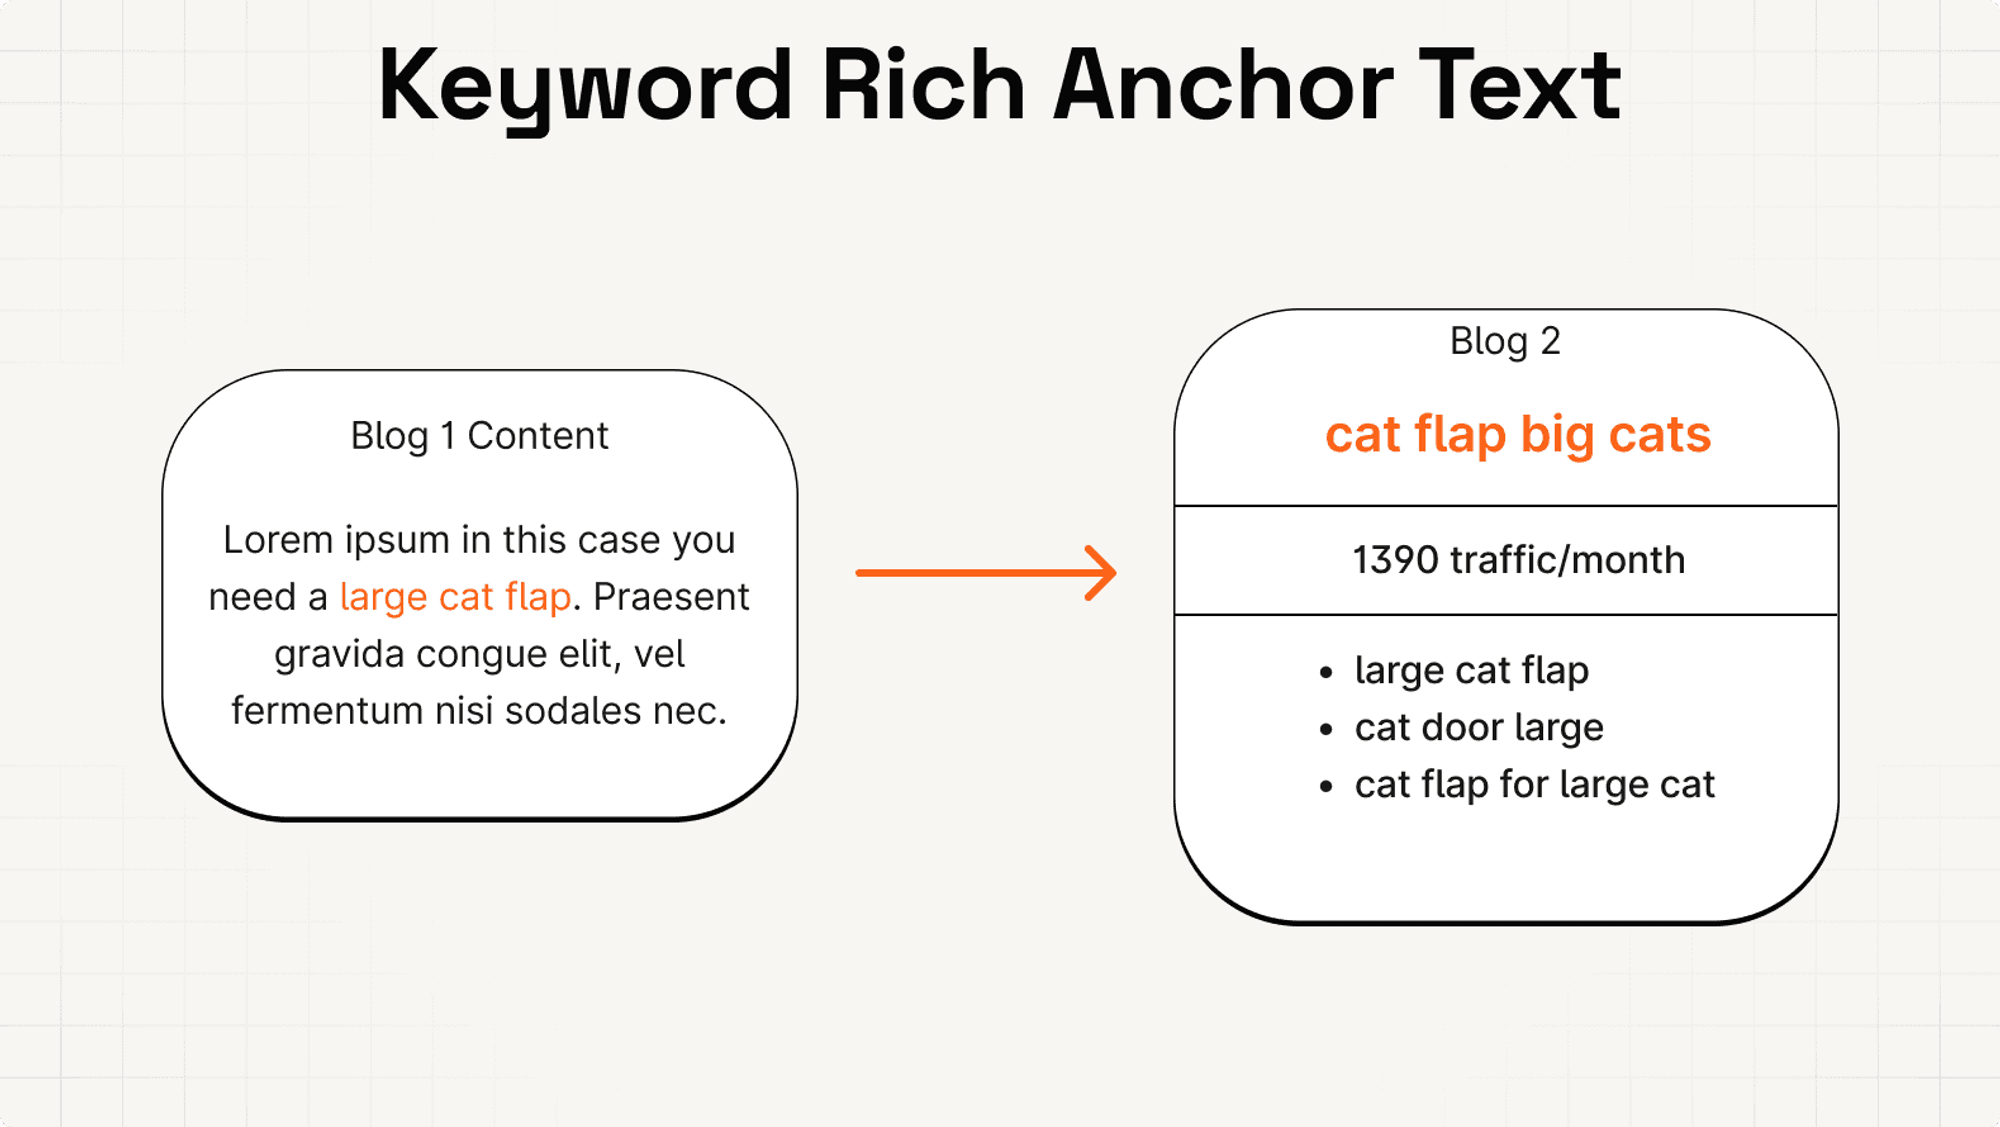
So when you link to a blog that was optimised for the topic "cat flap big cats", you should use this keyword or variations as anchor text.
Same for free tools or any other pages.
But why?
Well, this is what people use to find the pages. So it also describes the page best in as little words as possible.
Here is what Google says about the anchor texts.
Easy, right?
Page Indexing
We now know how and why we should crosslink our site.
Now let's look at a problem that usually only occurs when you have a lot of pages. So it really only starts to get important in the unaware stage of the customer journey.
When we start scaling our SEO efforts.
But what exactly is the problem?
Well, sometimes it happens that the Googlebot does not index all of the content we have on our page. But only a part of it.
And, well, that's not optimal.
But why could that happen?
It all comes down to how websites are rendered in the browser.
With Server Side Rendering, everything is seen by the Bot. So there will never be a problem.
But with Client Side Rendering you leave it up to the Googlebot to load the content. This can sometimes lead to problems.
But how can we check if there is a problem or not?
It's easy. First, we check the rendering type of our page. Then, depending on the results, we'll check if we have a problem or not.
To make it easy for you, I'll use an article about butter lettuce by Masterclass as reference.
Step #1 - Check your Rendering Type
First, we need to know if we use Client Side Rendering, Server Side Rendering, or a mix.
To do that, select a random page. It doesn't matter which one. Just use one of your many content peaces.
The only requirement here is that the page is indexed already.
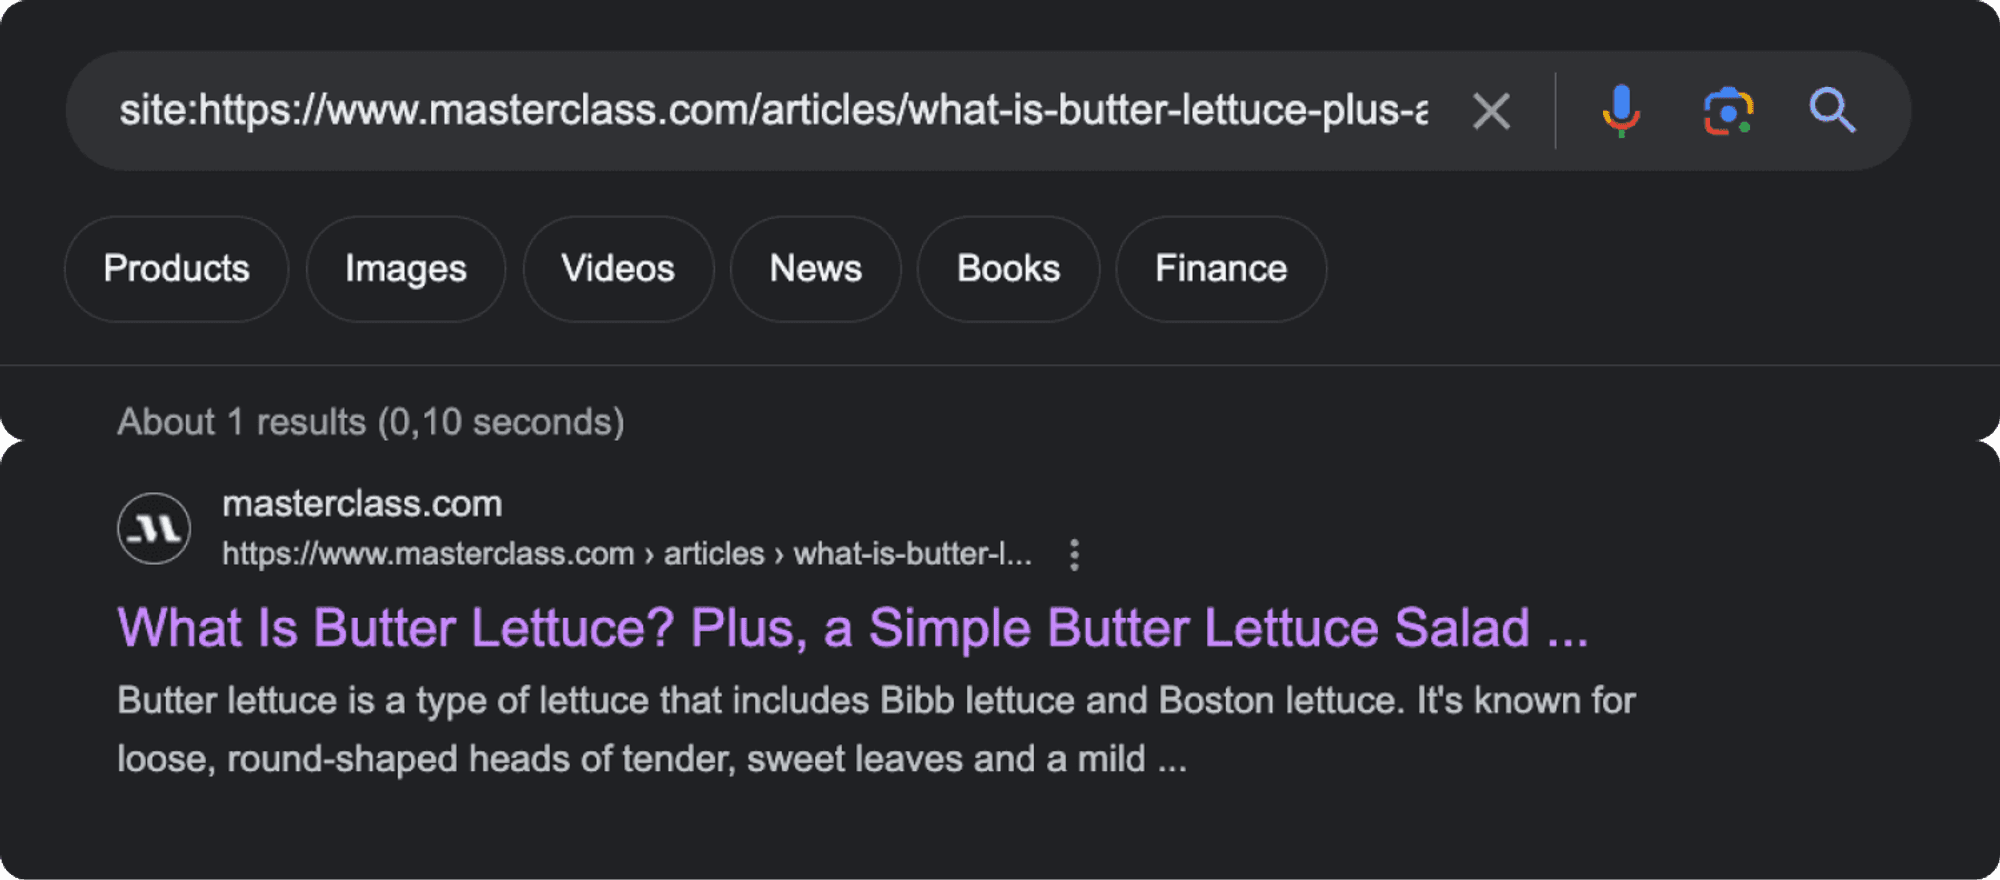
To know if this is the case, search for site:<url-of-the-content>.
If you see a result, you're good!
Now open the page in Google Chrome.
Other browsers also work but I'll show it using Chrome. So use the same to follow along.
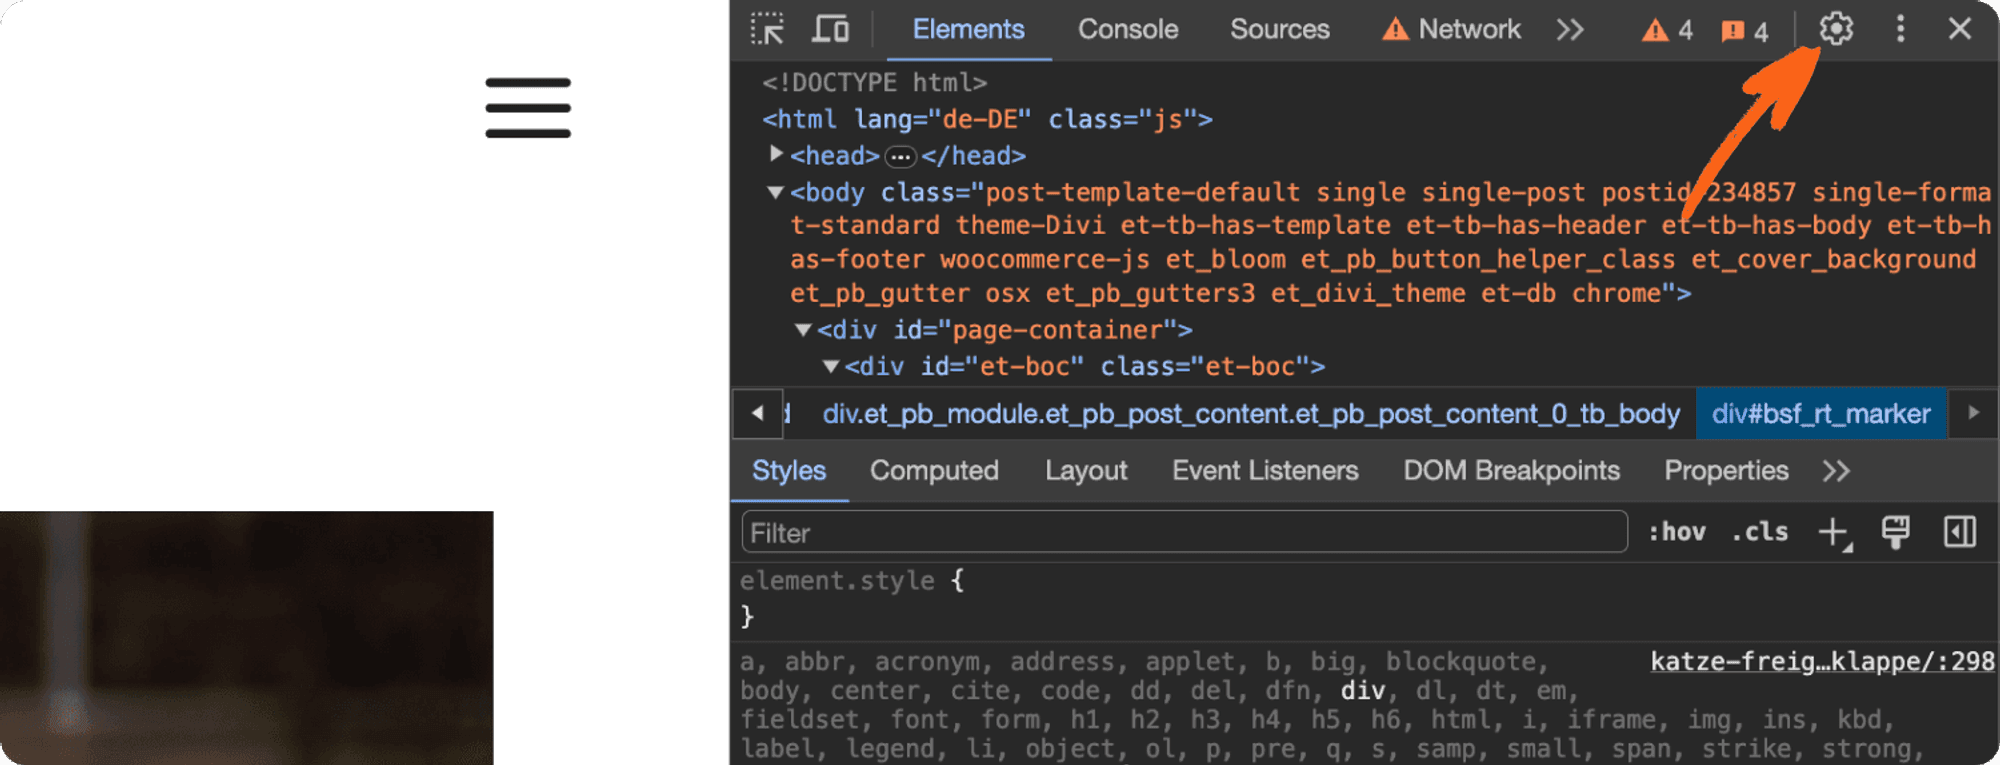
Open your selected page, right click and choose the Inspect option.

A tab opens on the right side. Ignore everything & just click on the settings icon.
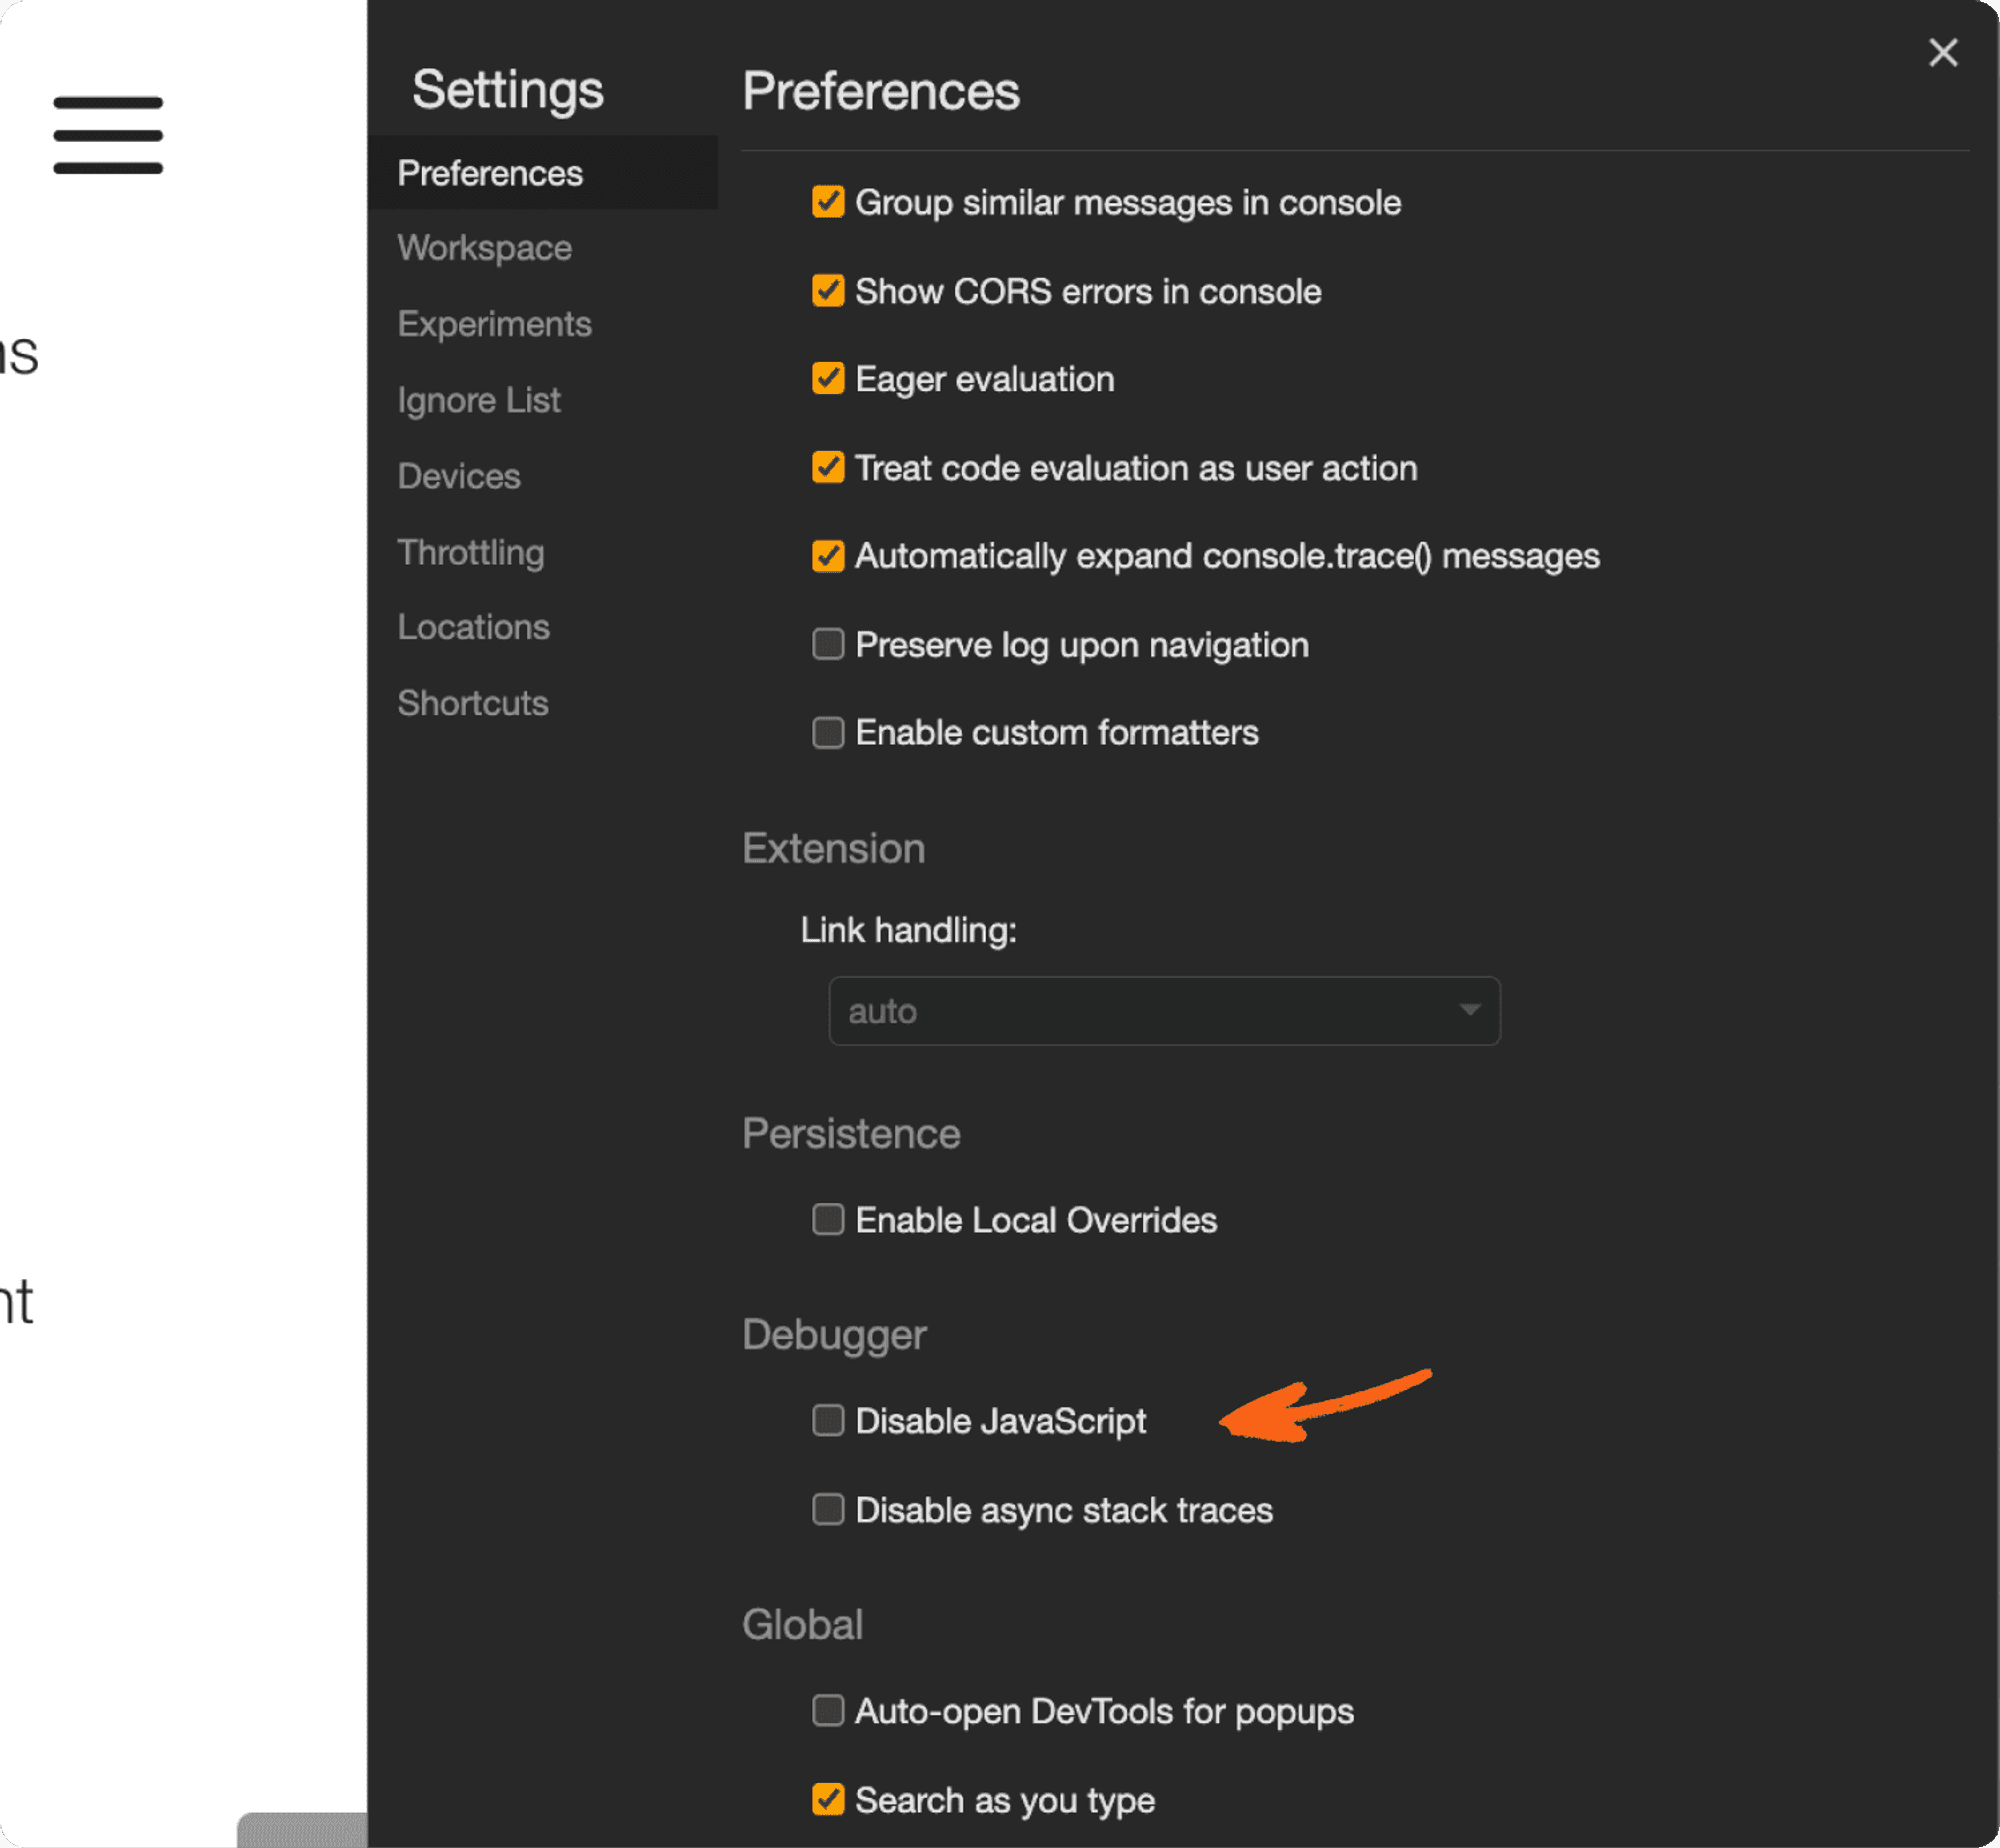
Stay in the Preferences tab and just scroll down until you see the Debugger options.
There, tick the Disable JavaScript checkbox.

Now reload the page.
This shows you what the Googlebot sees without loading the content. The page most likely looks weird. That's fine.
If you can see all of the content in here, you're using Server Side Rendering.
If all of the content is missing, you're using Client Side rendering.
If some part is missing, you use a mix of both. This is the most common case.
For the Masterclass article, you can see that the full lower part of the content is loaded.
Thus, Masterclass uses mixed rendering.
Step #2 - Check if Google Indexed Everything
Nice! We now know what type of rendering we use.
But does Google index all of our content?
Do we have a problem?
Well, if you use Server Side Rendering, you're good. No need to read further. You don't have a problem. Google sees the full page. Everything is good.
But if you use Client Side Rendering or a mixed form, we need to check if the Googlebot successfully loaded the content.
To do that, enable Javascript again by removing the tick you set for Disable Javascript checkbox.
The box should not be ticked anymore.
Then close the settings, reload the page and copy some part of the content that was missing previously.
Open a new tab and search for the following
site:<url-of-the-site> "previously missing content"
Replace <url-of-the-site> with your page url and "previously missing content" with the missing content that had to be loaded.
Here is how this would look like for the Masterclass article.
Some missing content is "What's the Difference Between Butter Lettuce and Romaine Lettuce?"

I copy that.
And search for it on Google.
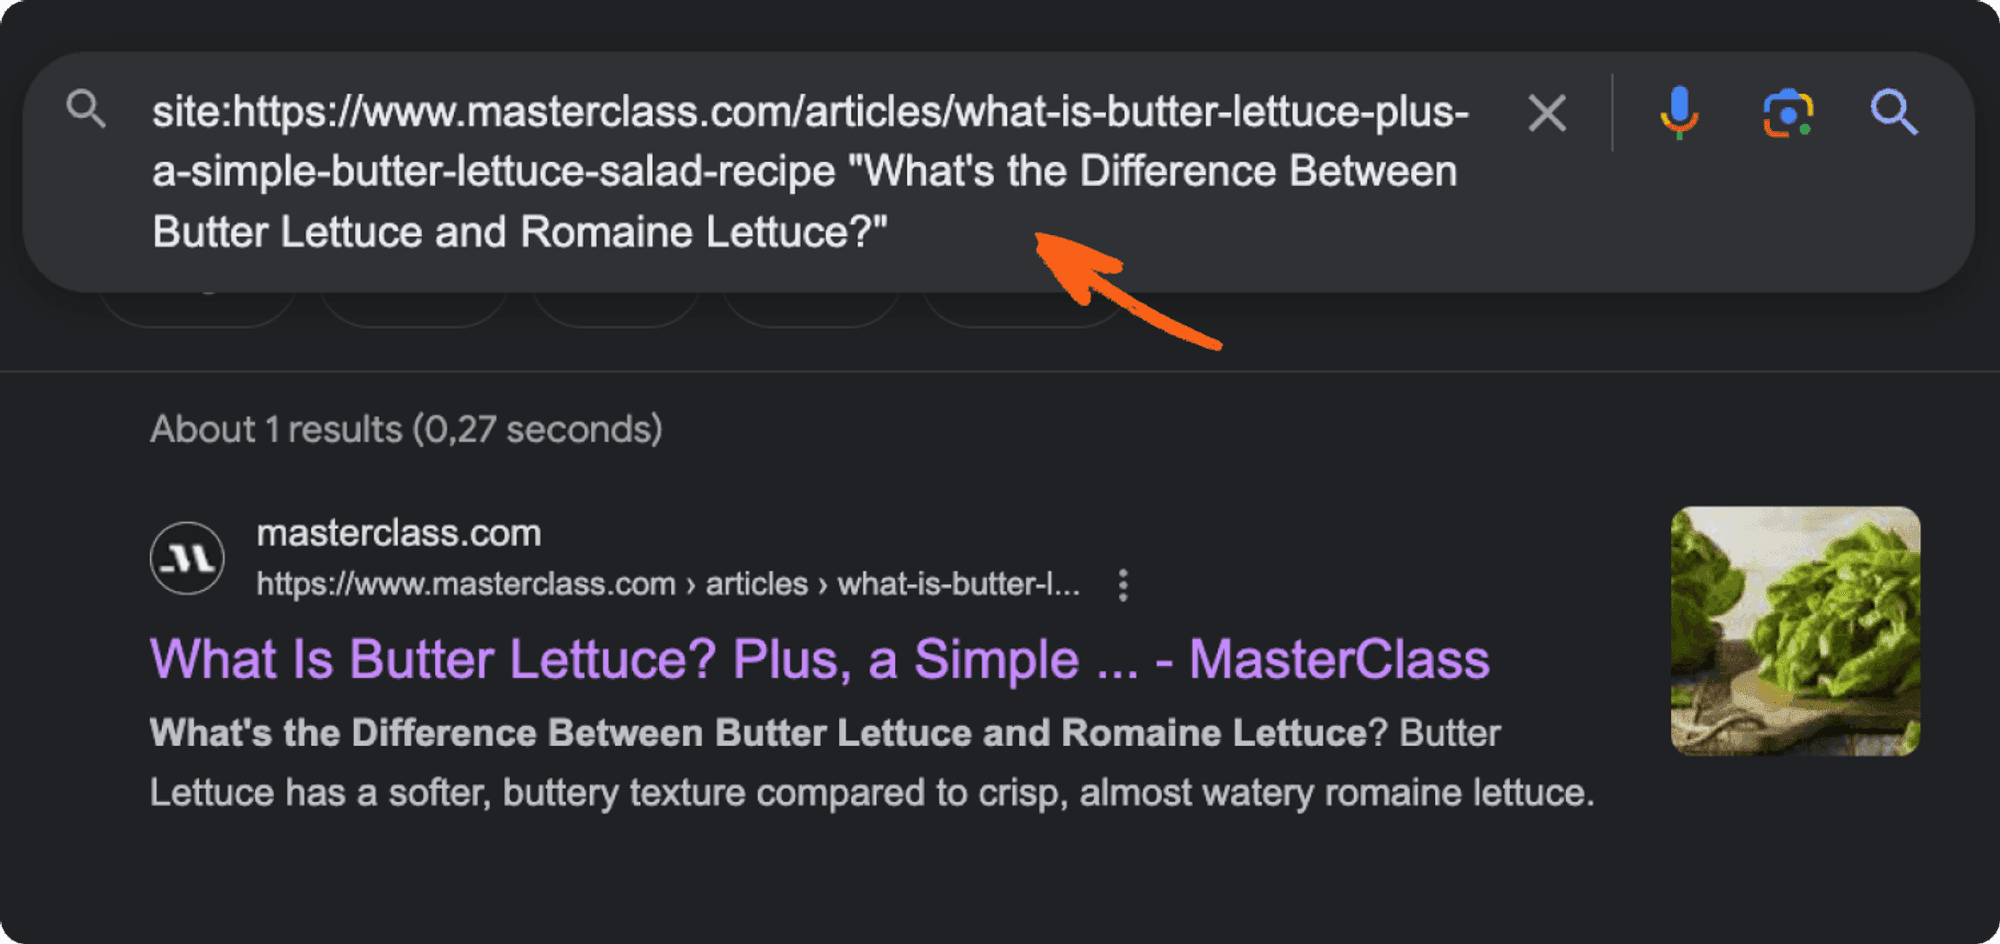
As we can see, Google finds our page with the content.
Thus, the Googlebot loaded the content successfully.
Nice!
So no problem here! 🚀
Repeat this check for a couple of pages. If all of them are successful, you're good. You don't have a problem.
If some of the content can't be found, you have to switch to Server Side Rendering. Nothing crazy complicated.
Your dev team will know what to do!
Internal Linking
Internal Linking is the process of cross linking your own pages.
In other words, if you link from page 1 of your site to page 2, page 2 has one more ingoing internal link.
But why does this matter?
Well, Graphite found that there is a correlation between number of ingoing links and the traffic that page gets.
The more internal links a site has, the more frequently the Google Bot will find the page & the more traffic it gets.
Sounds unintuitive, I agree.
But it's just what the data shows. Data doesn't lie.
So what Graphite suggests is to aim for 5-10 ingoing internal links for all pages that you care about. This could be blog pages, free tools, etc.
Sounds good - but how can we implement this?
Let me show you.
First, you need to find the pages with little ingoing links (<5).
To do that, you can either use a paid tool like Screamingfrog, Ahrefs or the free Google Search Console.
The thing with Google Search Console is that it often doesn't show data for all pages.
Still, it's a great place to start.
To find the internal link data, navigate to the Links section. On the right you will find the number of ingoing links for your pages.
Next, find the pages with little ingoing links (less than 5).
Then add links from other places of your website to these pages.
Which pages you connect is not super important. It just has to make sense for the user.
Let me give you an example.
Let’s say, I want to increase the number of ingoing links to one of my blog pages.
Then, you link to the blog page from within the text of other blogs. Here is an example of how this looks like.
Of course, the links have to make sense. Don't just link to random things.
Another option for internal linking is the "Related Content" section at the bottom of the page.
But you could also add links from other pages like the landing page.
Nice!
One last thing. Take a look again at the previous example.
The clickable text that has a link associated with it is called anchor text.
And it's important to use keyword rich anchor text.
Because this clearly shows Google what the content you link to is about.
So when you link to a blog that was optimised for the topic "cat flap big cats", you should use this keyword or variations as anchor text.
Same for free tools or any other pages.
But why?
Well, this is what people use to find the pages. So it also describes the page best in as little words as possible.
Here is what Google says about the anchor texts.
Easy, right?
Page Indexing
We now know how and why we should crosslink our site.
Now let's look at a problem that usually only occurs when you have a lot of pages. So it really only starts to get important in the unaware stage of the customer journey.
When we start scaling our SEO efforts.
But what exactly is the problem?
Well, sometimes it happens that the Googlebot does not index all of the content we have on our page. But only a part of it.
And, well, that's not optimal.
But why could that happen?
It all comes down to how websites are rendered in the browser.
With Server Side Rendering, everything is seen by the Bot. So there will never be a problem.
But with Client Side Rendering you leave it up to the Googlebot to load the content. This can sometimes lead to problems.
But how can we check if there is a problem or not?
It's easy. First, we check the rendering type of our page. Then, depending on the results, we'll check if we have a problem or not.
To make it easy for you, I'll use an article about butter lettuce by Masterclass as reference.
Step #1 - Check your Rendering Type
First, we need to know if we use Client Side Rendering, Server Side Rendering, or a mix.
To do that, select a random page. It doesn't matter which one. Just use one of your many content peaces.
The only requirement here is that the page is indexed already.
To know if this is the case, search for site:<url-of-the-content>.
If you see a result, you're good!
Now open the page in Google Chrome.
Other browsers also work but I'll show it using Chrome. So use the same to follow along.
Open your selected page, right click and choose the Inspect option.
A tab opens on the right side. Ignore everything & just click on the settings icon.
Stay in the Preferences tab and just scroll down until you see the Debugger options.
There, tick the Disable JavaScript checkbox.
Now reload the page.
This shows you what the Googlebot sees without loading the content. The page most likely looks weird. That's fine.
If you can see all of the content in here, you're using Server Side Rendering.
If all of the content is missing, you're using Client Side rendering.
If some part is missing, you use a mix of both. This is the most common case.
For the Masterclass article, you can see that the full lower part of the content is loaded.
Thus, Masterclass uses mixed rendering.
Step #2 - Check if Google Indexed Everything
Nice! We now know what type of rendering we use.
But does Google index all of our content?
Do we have a problem?
Well, if you use Server Side Rendering, you're good. No need to read further. You don't have a problem. Google sees the full page. Everything is good.
But if you use Client Side Rendering or a mixed form, we need to check if the Googlebot successfully loaded the content.
To do that, enable Javascript again by removing the tick you set for Disable Javascript checkbox.
The box should not be ticked anymore.
Then close the settings, reload the page and copy some part of the content that was missing previously.
Open a new tab and search for the following
site:<url-of-the-site> "previously missing content"
Replace <url-of-the-site> with your page url and "previously missing content" with the missing content that had to be loaded.
Here is how this would look like for the Masterclass article.
Some missing content is "What's the Difference Between Butter Lettuce and Romaine Lettuce?"
I copy that.
And search for it on Google.
As we can see, Google finds our page with the content.
Thus, the Googlebot loaded the content successfully.
Nice!
So no problem here! 🚀
Repeat this check for a couple of pages. If all of them are successful, you're good. You don't have a problem.
If some of the content can't be found, you have to switch to Server Side Rendering. Nothing crazy complicated.
Your dev team will know what to do!
Lower Impact Factors
In my opinion two other factors also have an impact.
Even though much lower!
So you can still rank well even though these two factors aren’t fulfilled.
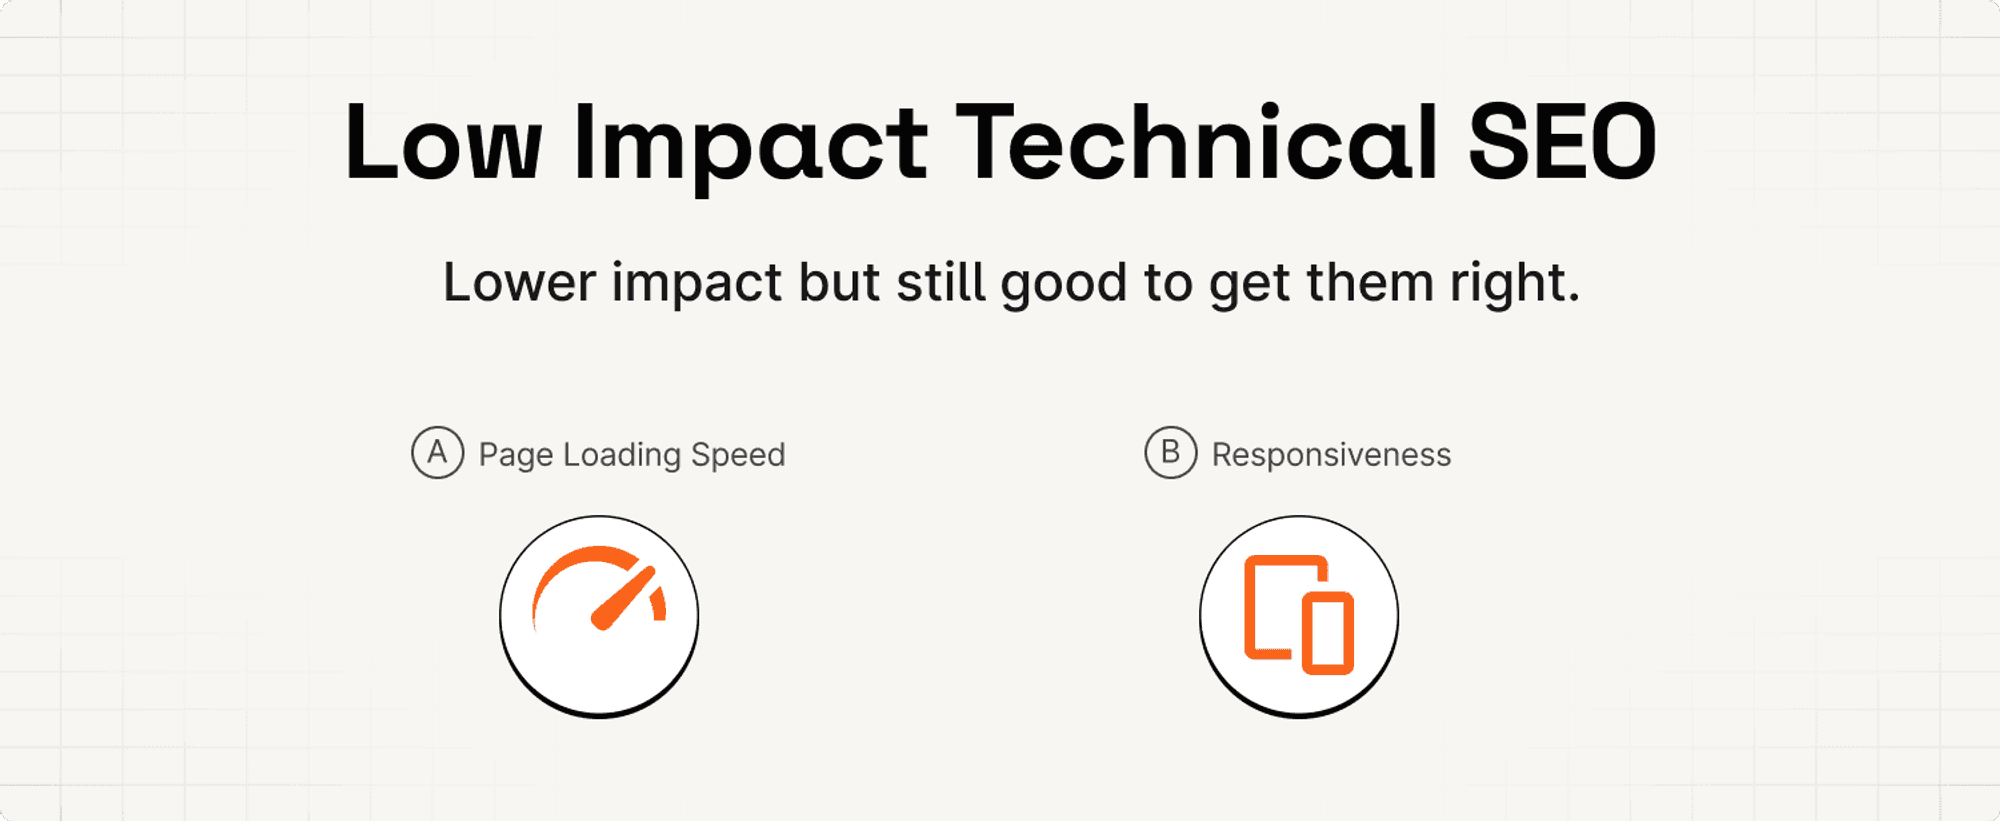
I am talking about page speed and responsiveness.
Page speed is the amount of time it takes your webpage to fully load.
Responsiveness is the ability of your website to adjust its layout and content to different screen sizes and devices.
Why do I think they matter?
Well, imagine this.
A page loads 4 seconds and when it finally loads, it's not responsive.
I bet you'd hit the "back" button faster than I could say "please don't, that's bad for my rankings".
But too late.
Google now knows that we didn't fulfil intent.
A very bad sign.
So make sure the page loads quickly and is responsive (=can be accessed from smartphones).
How can you check?
Use this tool to check the page loading speed of your site. If it's less than 2 seconds it's fine.
Open your website on your phone and click around. Can you read & click everything? Then it's responsive.
Great!
Google also developed metrics around these UX characteristics.
They are called Core Web Vitals.
You can see the performance for you site in Google Search Console.
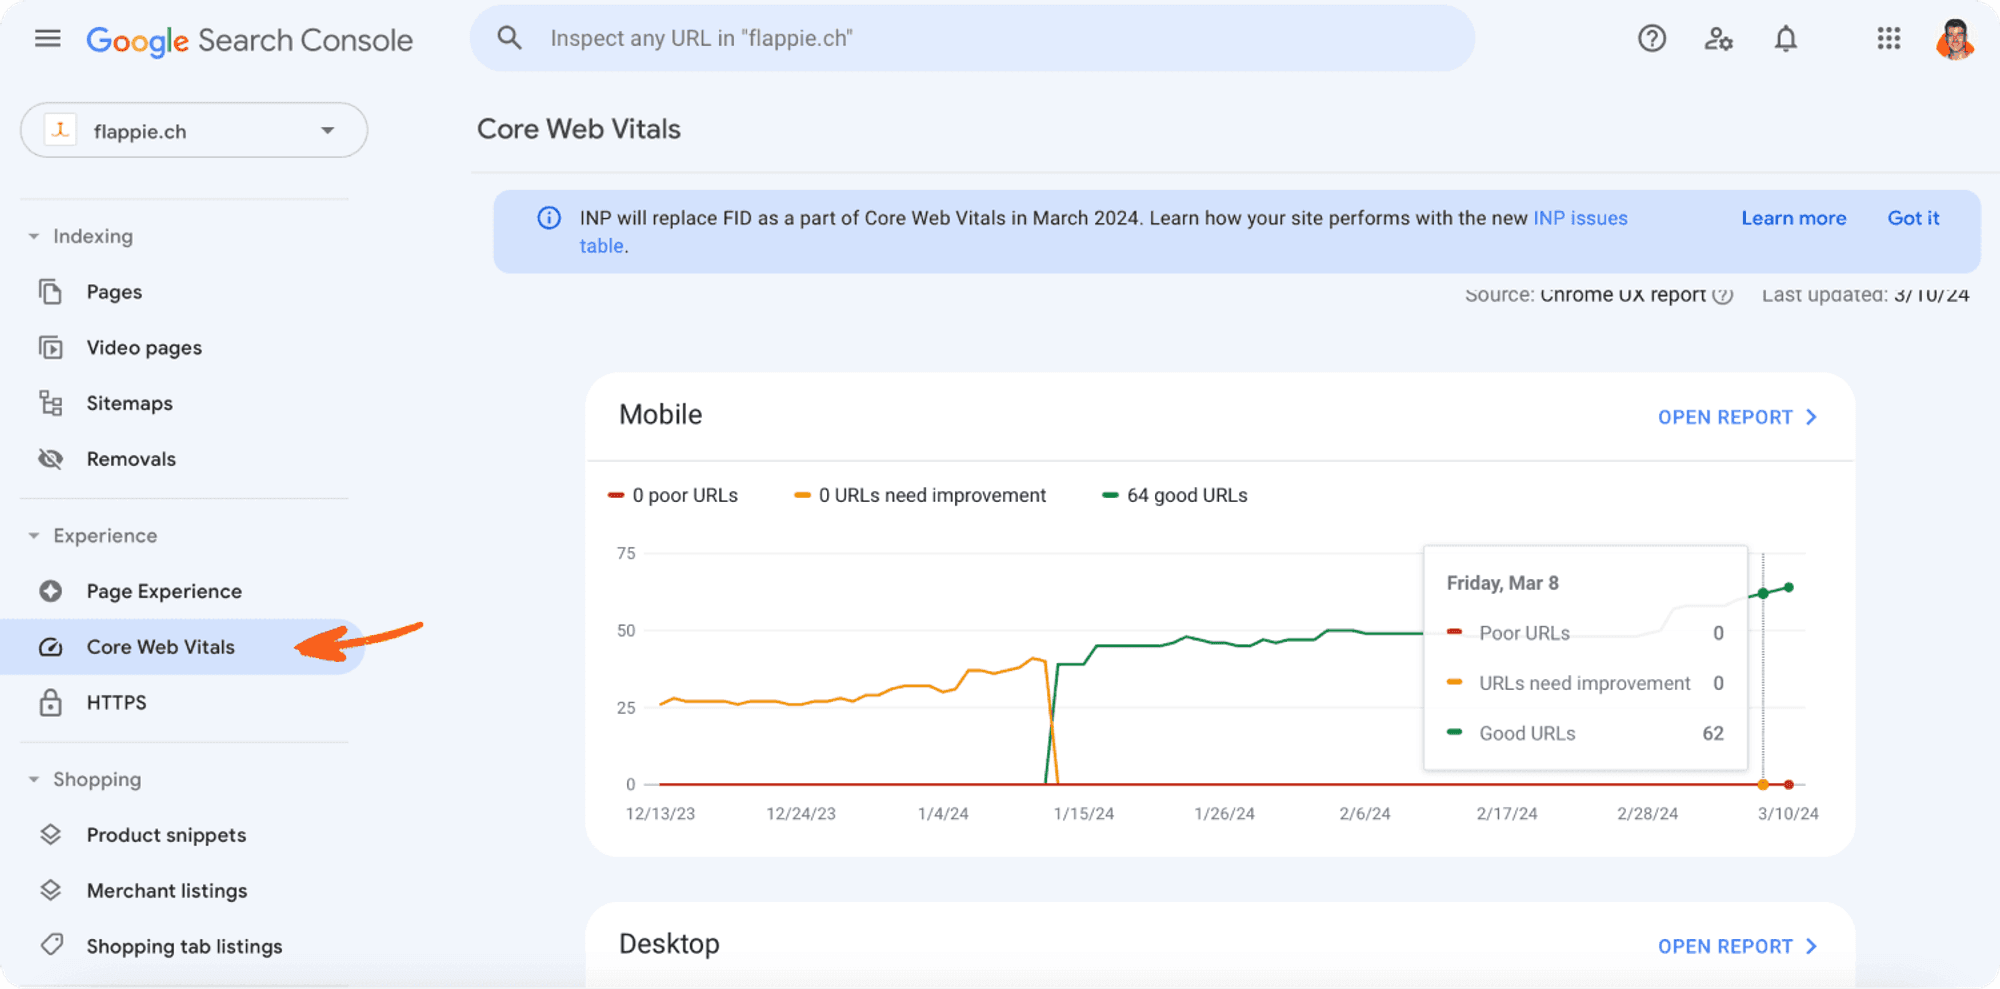
Navigate to the “Core Web Vitals” tab and see the performance for Mobile and on Desktop.
Just try to keep all URLs good.
Then you have nothing to fear!
In my opinion two other factors also have an impact.
Even though much lower!
So you can still rank well even though these two factors aren’t fulfilled.
I am talking about page speed and responsiveness.
Page speed is the amount of time it takes your webpage to fully load.
Responsiveness is the ability of your website to adjust its layout and content to different screen sizes and devices.
Why do I think they matter?
Well, imagine this.
A page loads 4 seconds and when it finally loads, it's not responsive.
I bet you'd hit the "back" button faster than I could say "please don't, that's bad for my rankings".
But too late.
Google now knows that we didn't fulfil intent.
A very bad sign.
So make sure the page loads quickly and is responsive (=can be accessed from smartphones).
How can you check?
Use this tool to check the page loading speed of your site. If it's less than 2 seconds it's fine.
Open your website on your phone and click around. Can you read & click everything? Then it's responsive.
Great!
Google also developed metrics around these UX characteristics.
They are called Core Web Vitals.
You can see the performance for you site in Google Search Console.
Navigate to the “Core Web Vitals” tab and see the performance for Mobile and on Desktop.
Just try to keep all URLs good.
Then you have nothing to fear!
Best Practices & Good To Know
Let’s review some other technical SEO concepts that are good to keep in mind.
But most of them only matter when you scale to thousands of pages.
Also make sure to read the SEO best practices overview by Google. It is gold!
Page Hierarchy
Try to keep the page hierarchy of your site flat and organised.
Ideally, every page can be reached within 3 clicks from the landing page.
Why?
Loosely speaking, the further away a page is from the landing page, the less important it seems.
Thus, very deep pages with little ingoing links can lead to indexing issues.
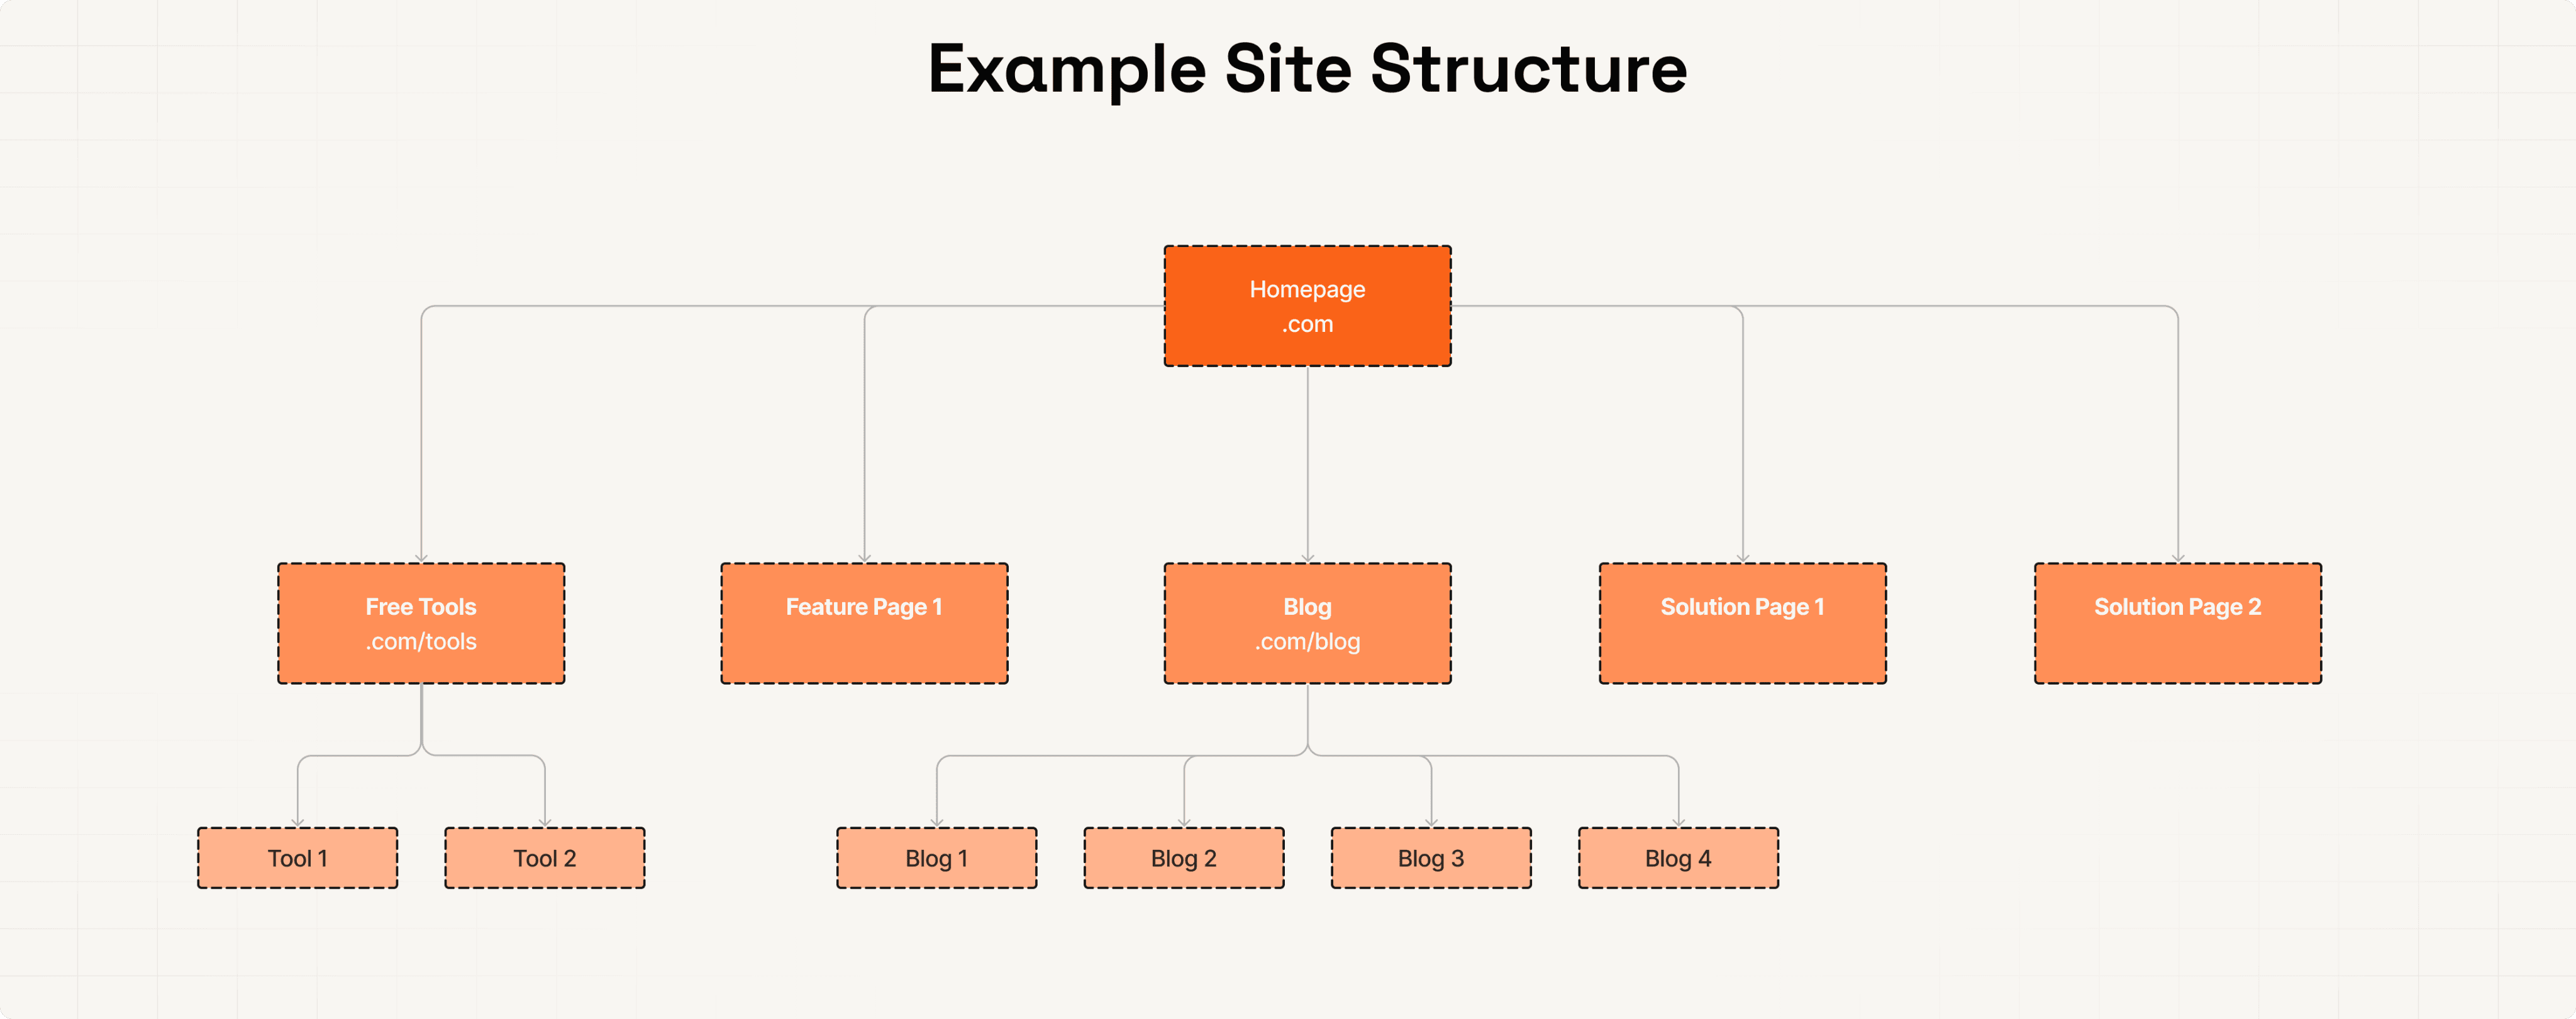
To keep your site organised, group together pages with similar content into subfolders. Google uses subfolders to understand the relationship of pages.
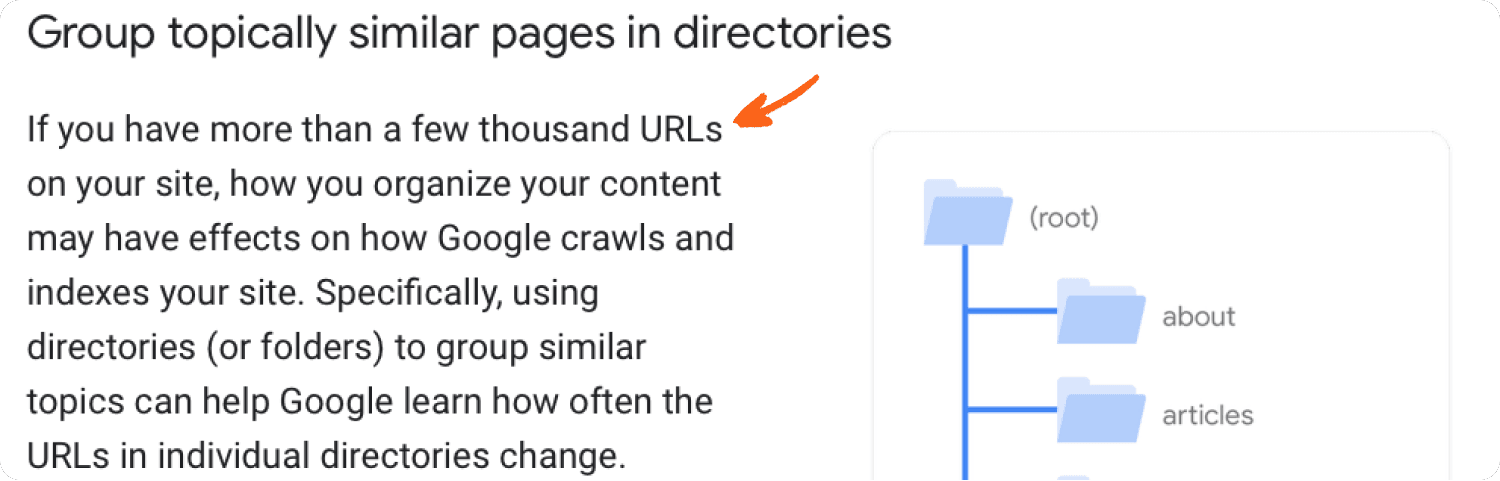
But the grouping really only matters with “more than a few thousand URLs”.
Sitemap.xml
A sitemap is a list of all urls that belong to your page.
It is automatically created if you use modern tools like Webflow or Framer.
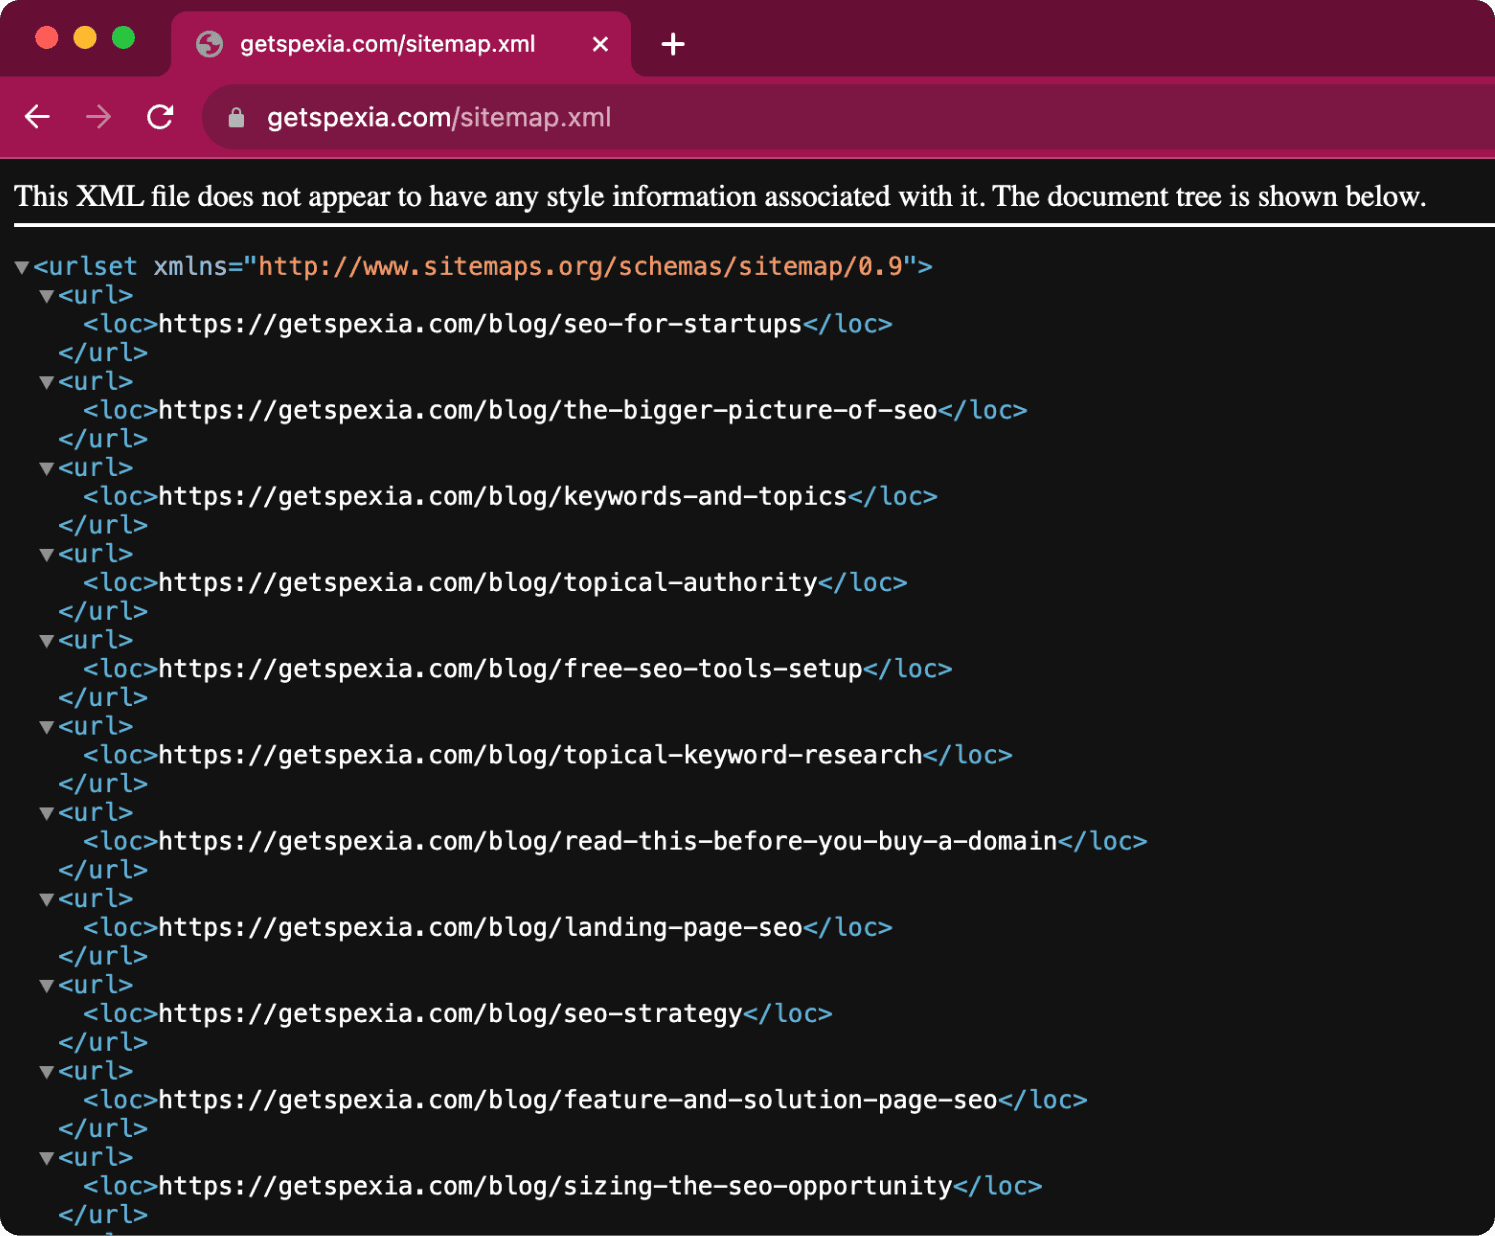
There is no one specific url where to find the sitemap.
But more often than not it’s on yourdomain.com/sitemap.xml.
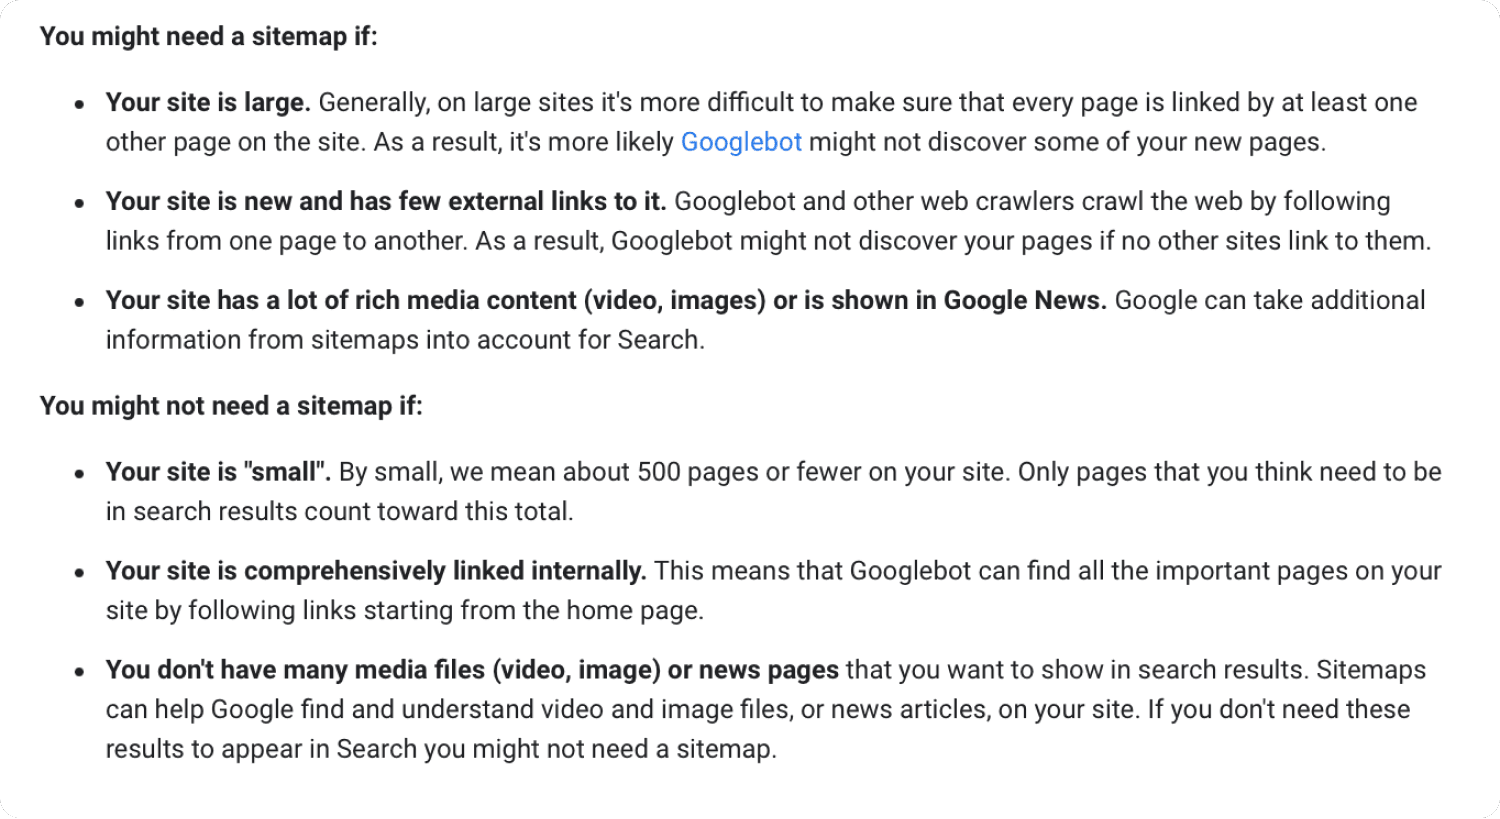
So the Sitemap is not really needed for small sites (<500 pages).
If you link to all pages and keep a flat page hierarchy, Google usually does not have a problem to find pages.
But with more content, it can help Google better understand and find all pages.
If you have to set the sitemap up yourself, check Googles official documentation.
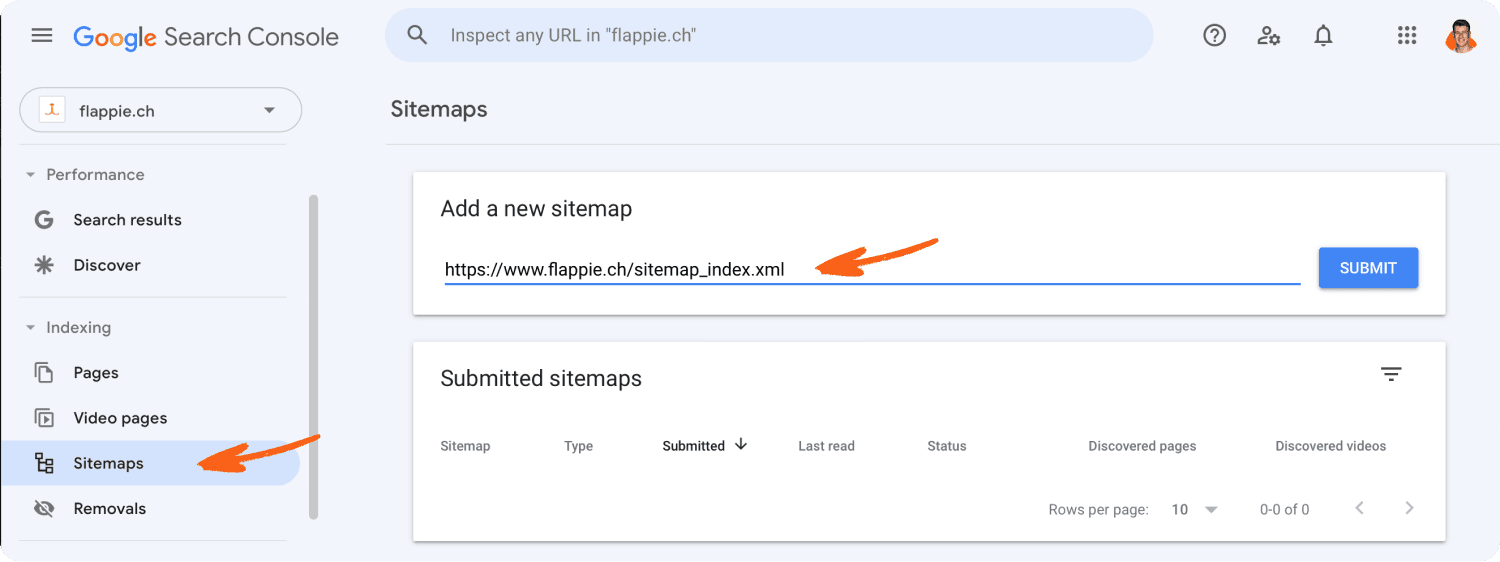
After setup, you need to let Google know where exactly the sitemap is.
You can submit a sitemap in the "Sitemaps" tab of Google Search Console.
Robots.txt
The robots.txt is located at *yourdomain.com/robots.txt* and is also automatically created if you use modern tools like Webflow or Framer.
But what is the robots.txt actually for?
To understand that, you have to know that there are different bots that go through the internet to index and analyse pages.
The Googlebot is one of them.
Ahrefs has its own.
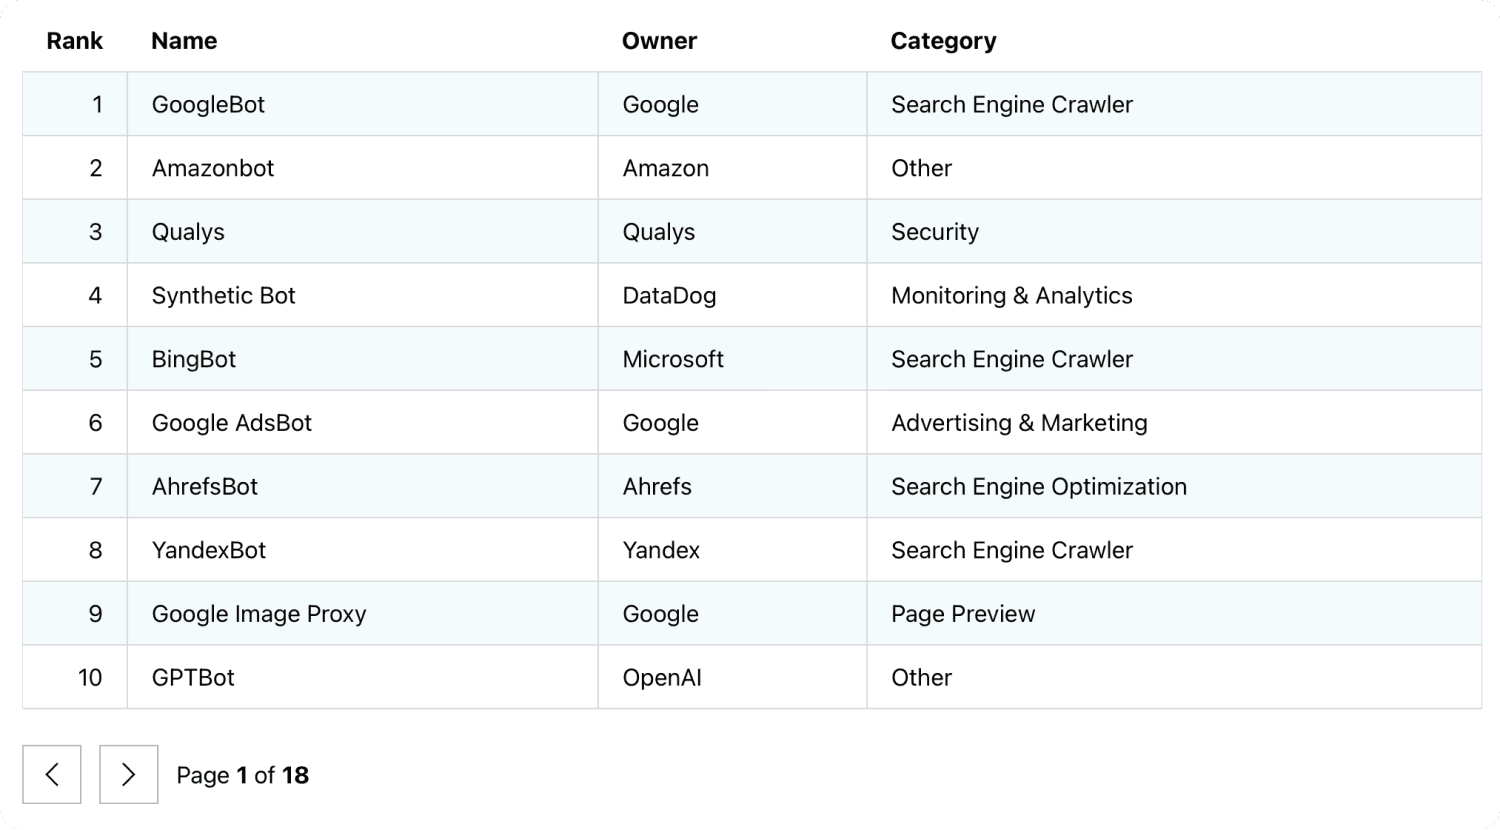
You might want to allow/prevent some of them to access specific pages.
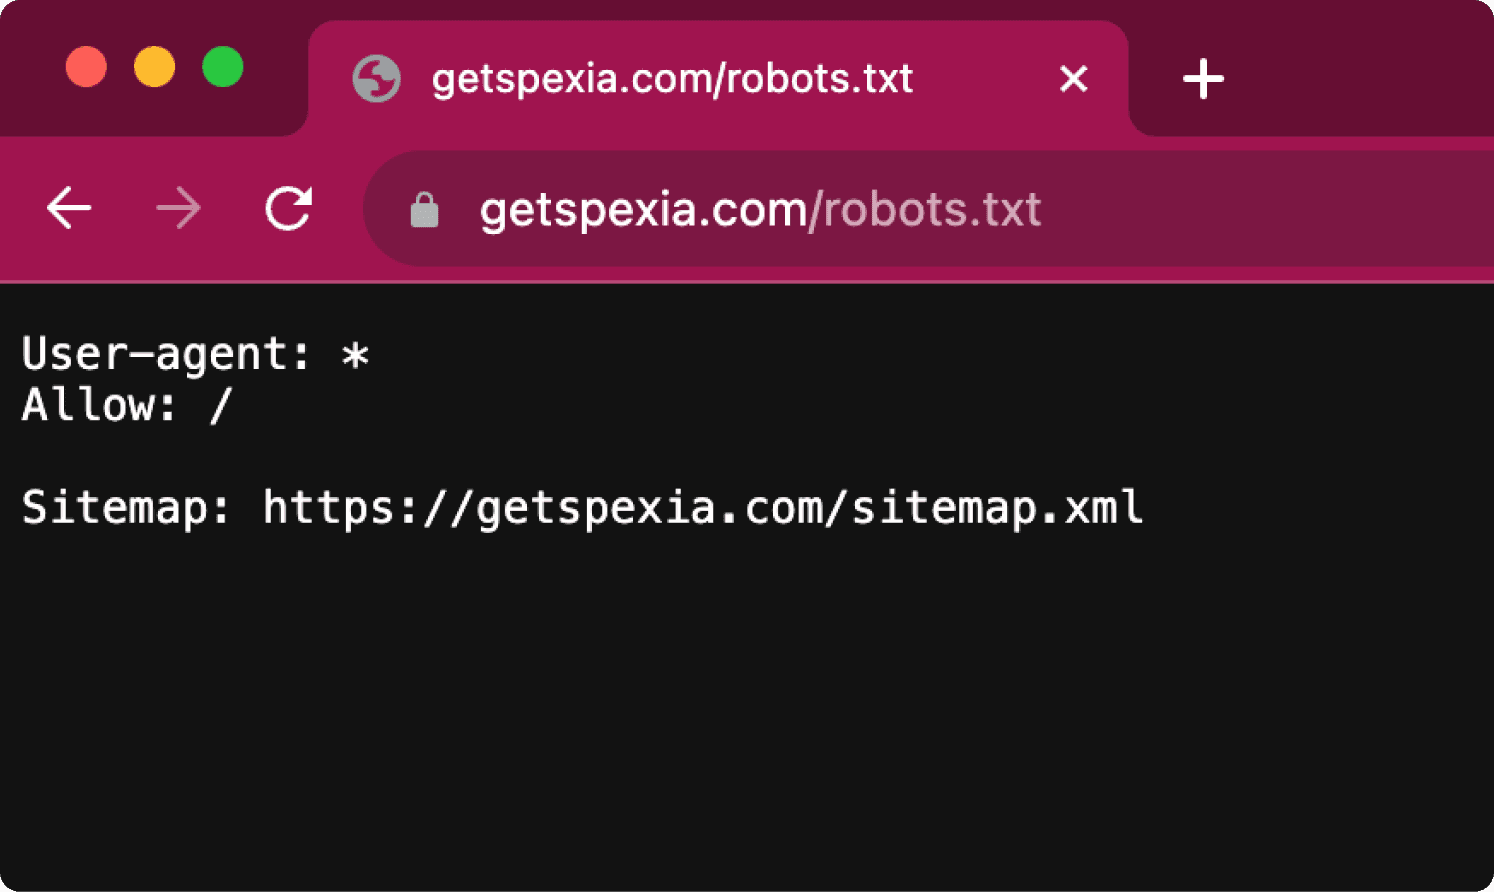
This is what the robots.txt is for.
An example could be that you want to prevent access to your admin panel.
This is what the robots.txt would look like.
User-agent: *
Disallow: /admin/
Sitemap: <https://yourdomain.com/sitemap.xml>
You can learn more about setting up the robots.txt in the official documentation.
But note that the robots.txt does not prevent indexing!
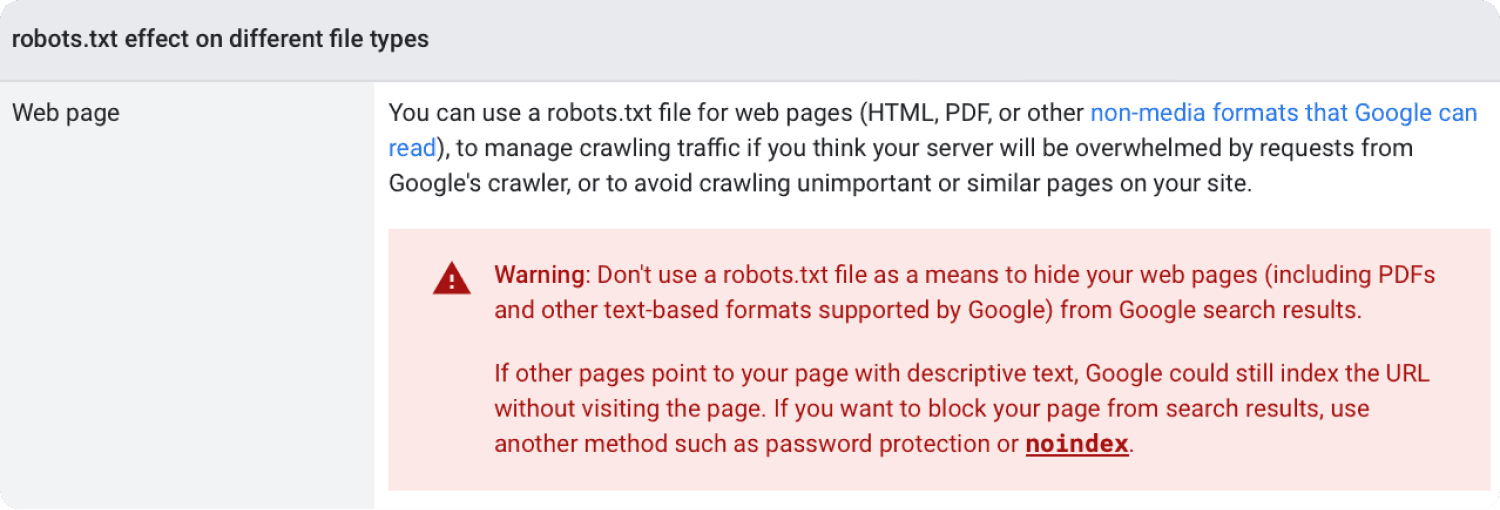
If people link to your page, even if disallowed in the robots.txt, it can still happen that a page shows up in the search results.
To prevent appearance in the search results use the noindex meta tag.
HTTPS
HTTPs is a protocol for sending content across the internet. While https is secure, it’s predecessor, http, is not.
Thus, always use https.
This is automatically handled if you use e.g. Wordpress, Webflow or Shopify. If not, your browser will show you a warning message.
Source of gif here.
Canonicalization
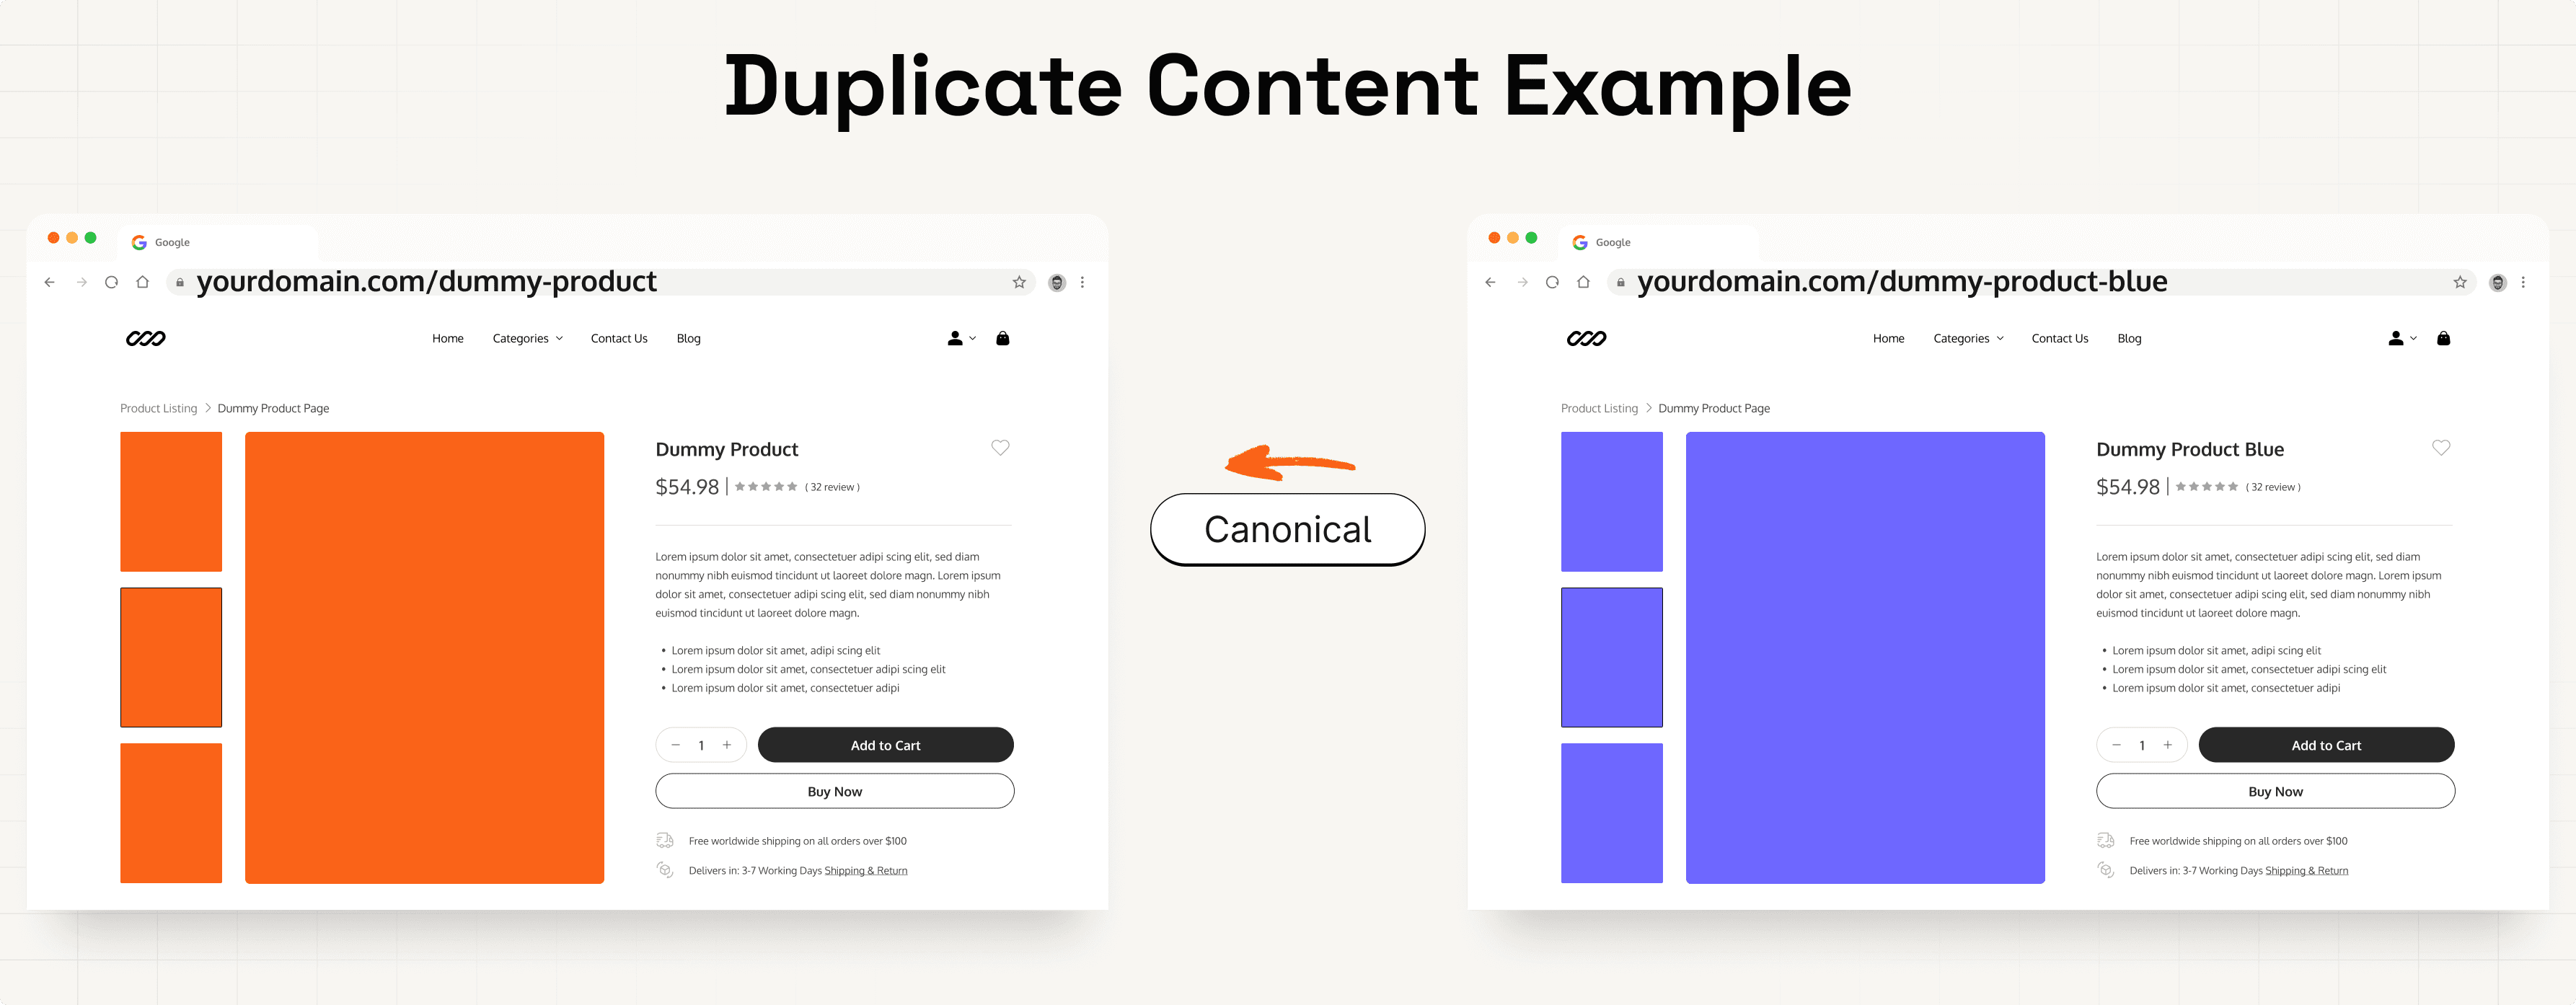
It can happen that a page has multiple unique urls that lead to the same or very similar content.
An example could be a product page of E-Commerce shops that has different urls depending on the product. All have pretty much the same content.
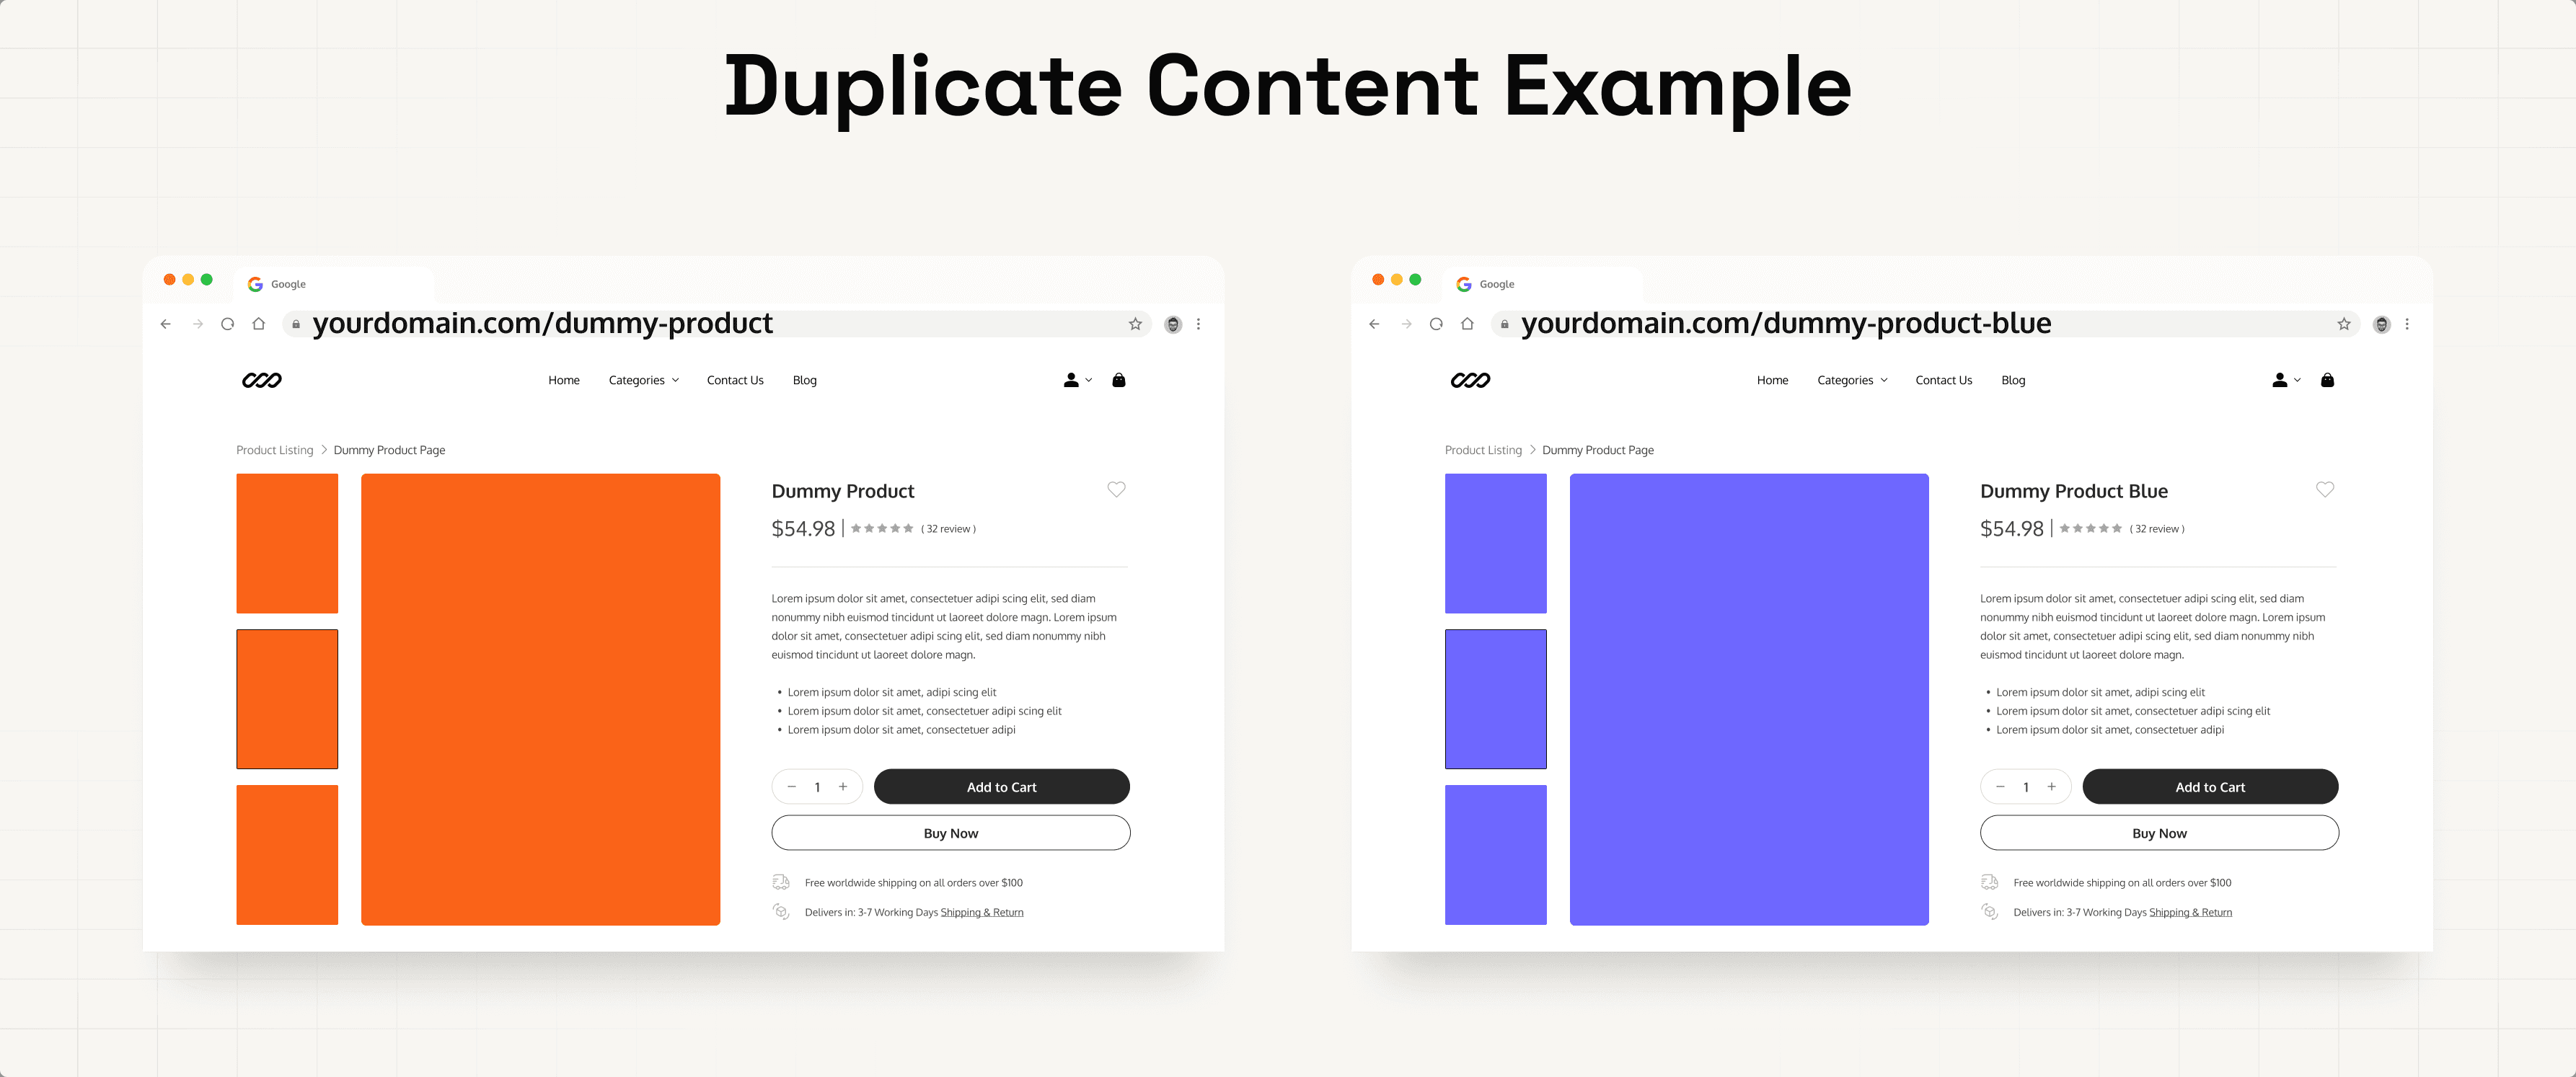
Canonicalization is the process of letting Google know which of these urls they should show to the user.
If you don’t tell them, Google will try to do it automatically for you.
To tell Google which url is the canonical one, use the canonical tag on all product variant pages, pointing to the url of the main product variant.
But don’t be afraid about it. Google state themselves that duplicate content is okay.
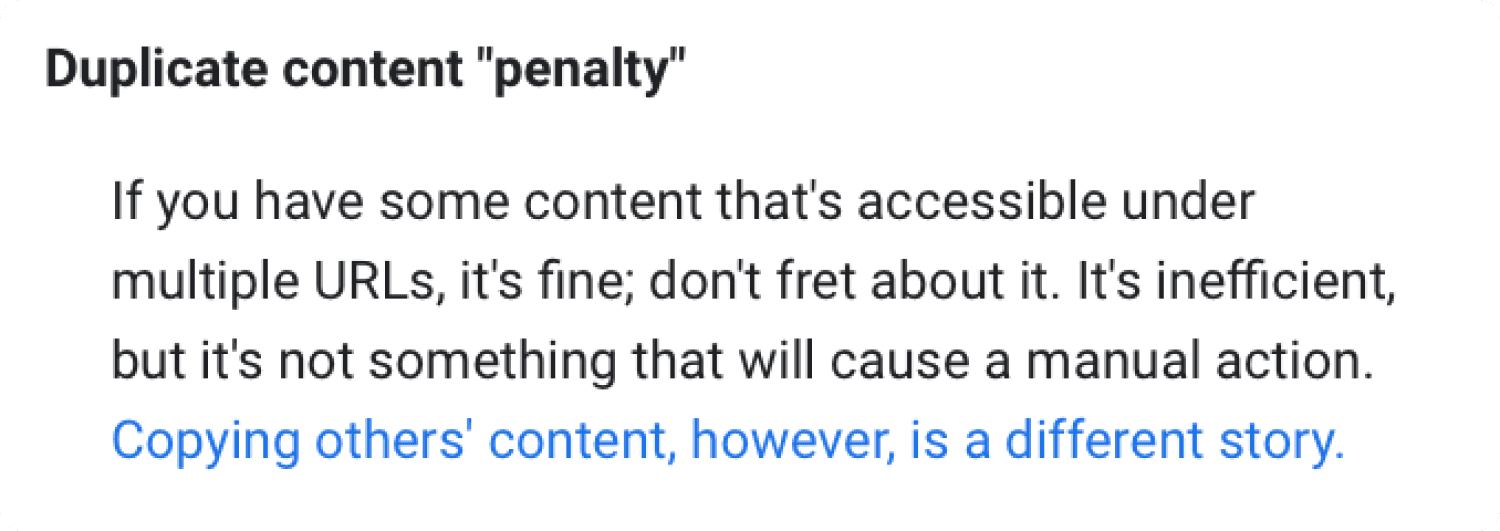
Still, as best practice is to add canonical tags.
Or prevent the duplicate pages from being indexed entirely using the noindex meta tag.
As a startup, I wouldn’t care about this in the beginning. Very unlikely that you run into duplicate content issues.
Link Attributes
Google uses links as a factor in determining the relevancy of web pages
When you link to a page, you endorse the page, show Google you are associated with it & allow Google to add it to discover new pages.
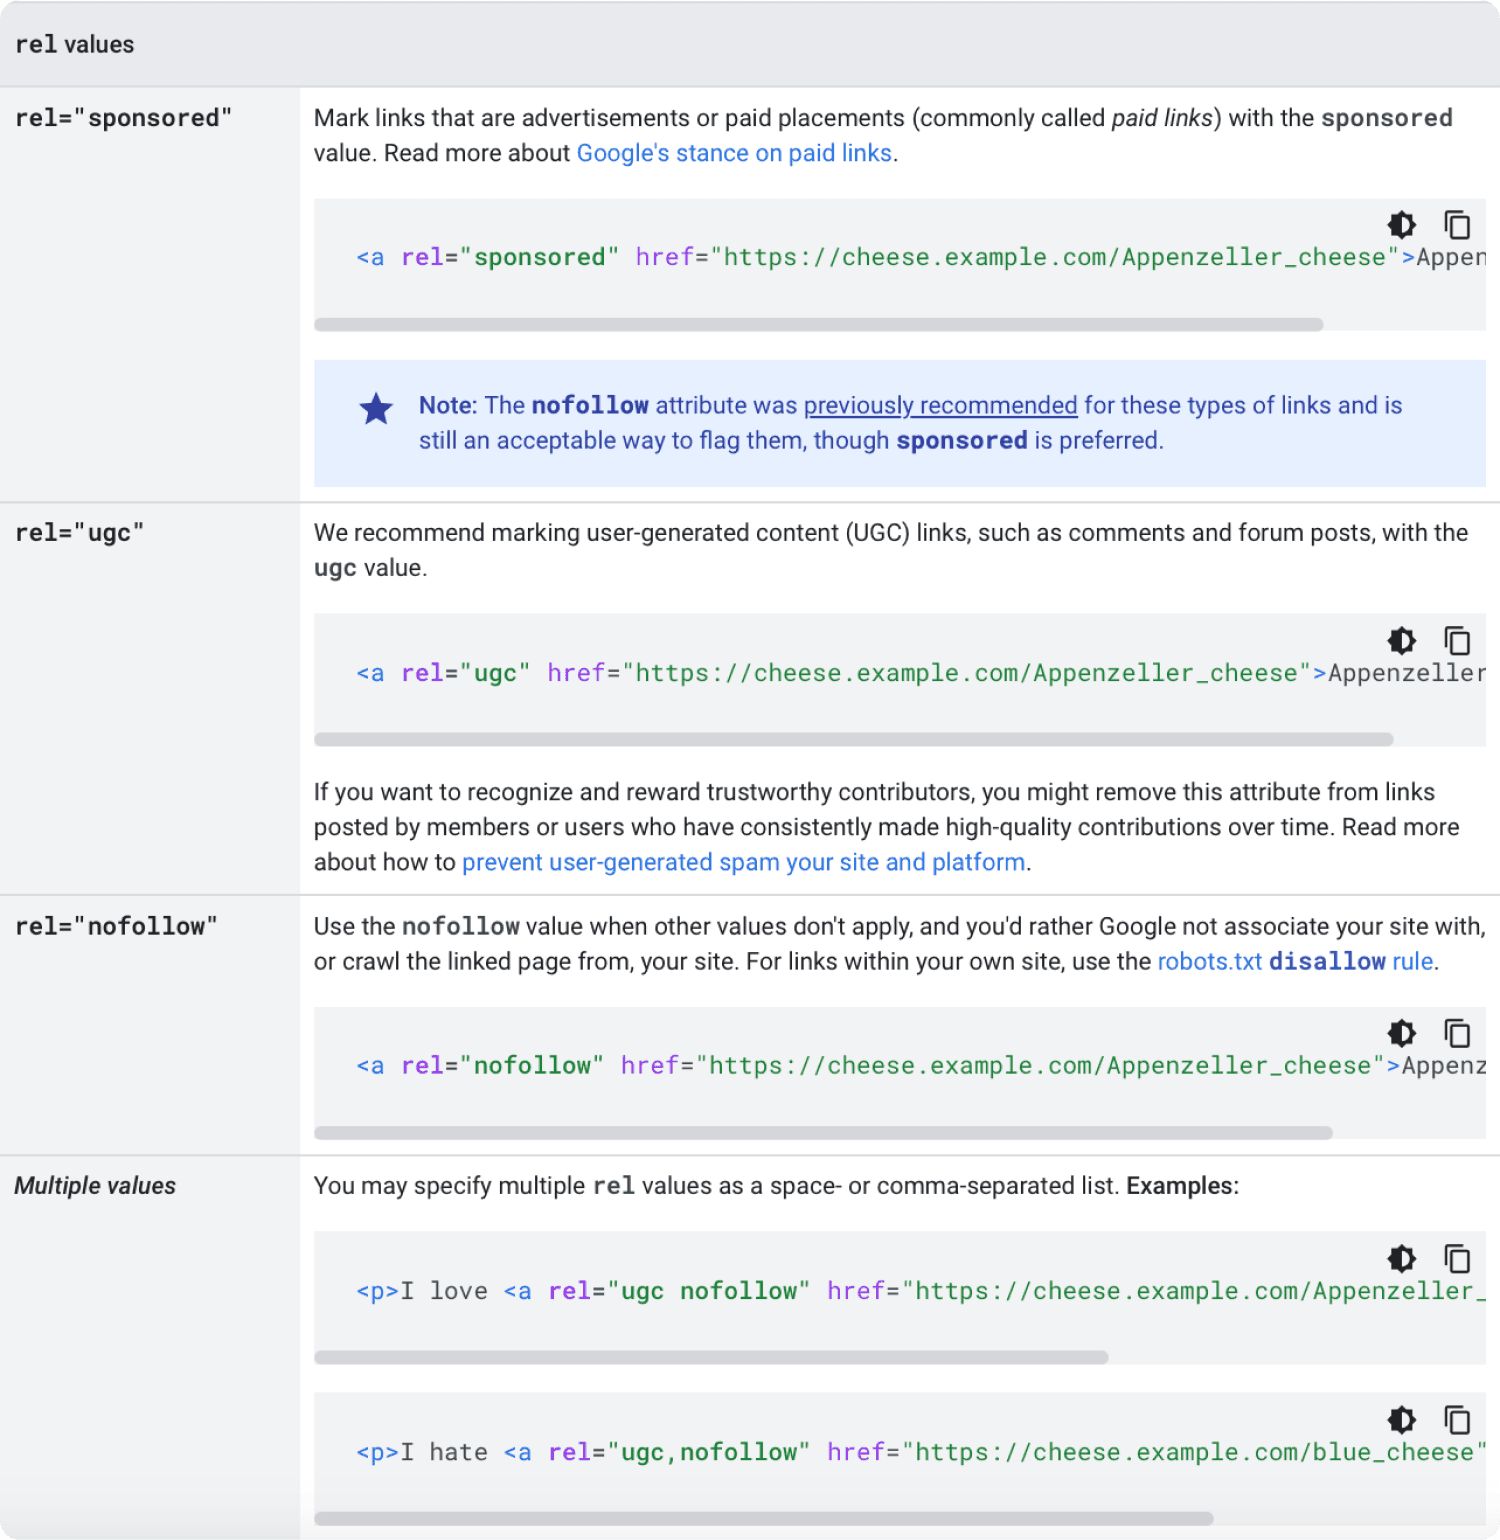
This isn’t always desirable. To give Google more information about a link, use link attributes.
Mark paid or advertisement links with the sponsored attribute.
Mark user generated content links with the ugc attribute. This way you don’t risk your sites reputation with the content your users post in the comments.
Mark links you don’t want to get associated with or don’t want Google to crawl with the nofollow attribute.
Here is a great overview on link attributes by Google.
Let’s review some other technical SEO concepts that are good to keep in mind.
But most of them only matter when you scale to thousands of pages.
Also make sure to read the SEO best practices overview by Google. It is gold!
Page Hierarchy
Try to keep the page hierarchy of your site flat and organised.
Ideally, every page can be reached within 3 clicks from the landing page.
Why?
Loosely speaking, the further away a page is from the landing page, the less important it seems.
Thus, very deep pages with little ingoing links can lead to indexing issues.
To keep your site organised, group together pages with similar content into subfolders. Google uses subfolders to understand the relationship of pages.
But the grouping really only matters with “more than a few thousand URLs”.
Sitemap.xml
A sitemap is a list of all urls that belong to your page.
It is automatically created if you use modern tools like Webflow or Framer.
There is no one specific url where to find the sitemap.
But more often than not it’s on yourdomain.com/sitemap.xml.
So the Sitemap is not really needed for small sites (<500 pages).
If you link to all pages and keep a flat page hierarchy, Google usually does not have a problem to find pages.
But with more content, it can help Google better understand and find all pages.
If you have to set the sitemap up yourself, check Googles official documentation.
After setup, you need to let Google know where exactly the sitemap is.
You can submit a sitemap in the "Sitemaps" tab of Google Search Console.
Robots.txt
The robots.txt is located at *yourdomain.com/robots.txt* and is also automatically created if you use modern tools like Webflow or Framer.
But what is the robots.txt actually for?
To understand that, you have to know that there are different bots that go through the internet to index and analyse pages.
The Googlebot is one of them.
Ahrefs has its own.
You might want to allow/prevent some of them to access specific pages.
This is what the robots.txt is for.
An example could be that you want to prevent access to your admin panel.
This is what the robots.txt would look like.
User-agent: *
Disallow: /admin/
Sitemap: <https://yourdomain.com/sitemap.xml>
You can learn more about setting up the robots.txt in the official documentation.
But note that the robots.txt does not prevent indexing!
If people link to your page, even if disallowed in the robots.txt, it can still happen that a page shows up in the search results.
To prevent appearance in the search results use the noindex meta tag.
HTTPS
HTTPs is a protocol for sending content across the internet. While https is secure, it’s predecessor, http, is not.
Thus, always use https.
This is automatically handled if you use e.g. Wordpress, Webflow or Shopify. If not, your browser will show you a warning message.
Source of gif here.
Canonicalization
It can happen that a page has multiple unique urls that lead to the same or very similar content.
An example could be a product page of E-Commerce shops that has different urls depending on the product. All have pretty much the same content.
Canonicalization is the process of letting Google know which of these urls they should show to the user.
If you don’t tell them, Google will try to do it automatically for you.
To tell Google which url is the canonical one, use the canonical tag on all product variant pages, pointing to the url of the main product variant.
But don’t be afraid about it. Google state themselves that duplicate content is okay.
Still, as best practice is to add canonical tags.
Or prevent the duplicate pages from being indexed entirely using the noindex meta tag.
As a startup, I wouldn’t care about this in the beginning. Very unlikely that you run into duplicate content issues.
Link Attributes
Google uses links as a factor in determining the relevancy of web pages
When you link to a page, you endorse the page, show Google you are associated with it & allow Google to add it to discover new pages.
This isn’t always desirable. To give Google more information about a link, use link attributes.
Mark paid or advertisement links with the sponsored attribute.
Mark user generated content links with the ugc attribute. This way you don’t risk your sites reputation with the content your users post in the comments.
Mark links you don’t want to get associated with or don’t want Google to crawl with the nofollow attribute.
Here is a great overview on link attributes by Google.
The Verdict
If you ever get a "free SEO audit" from an agency, with 100+ errors, don't be impressed.
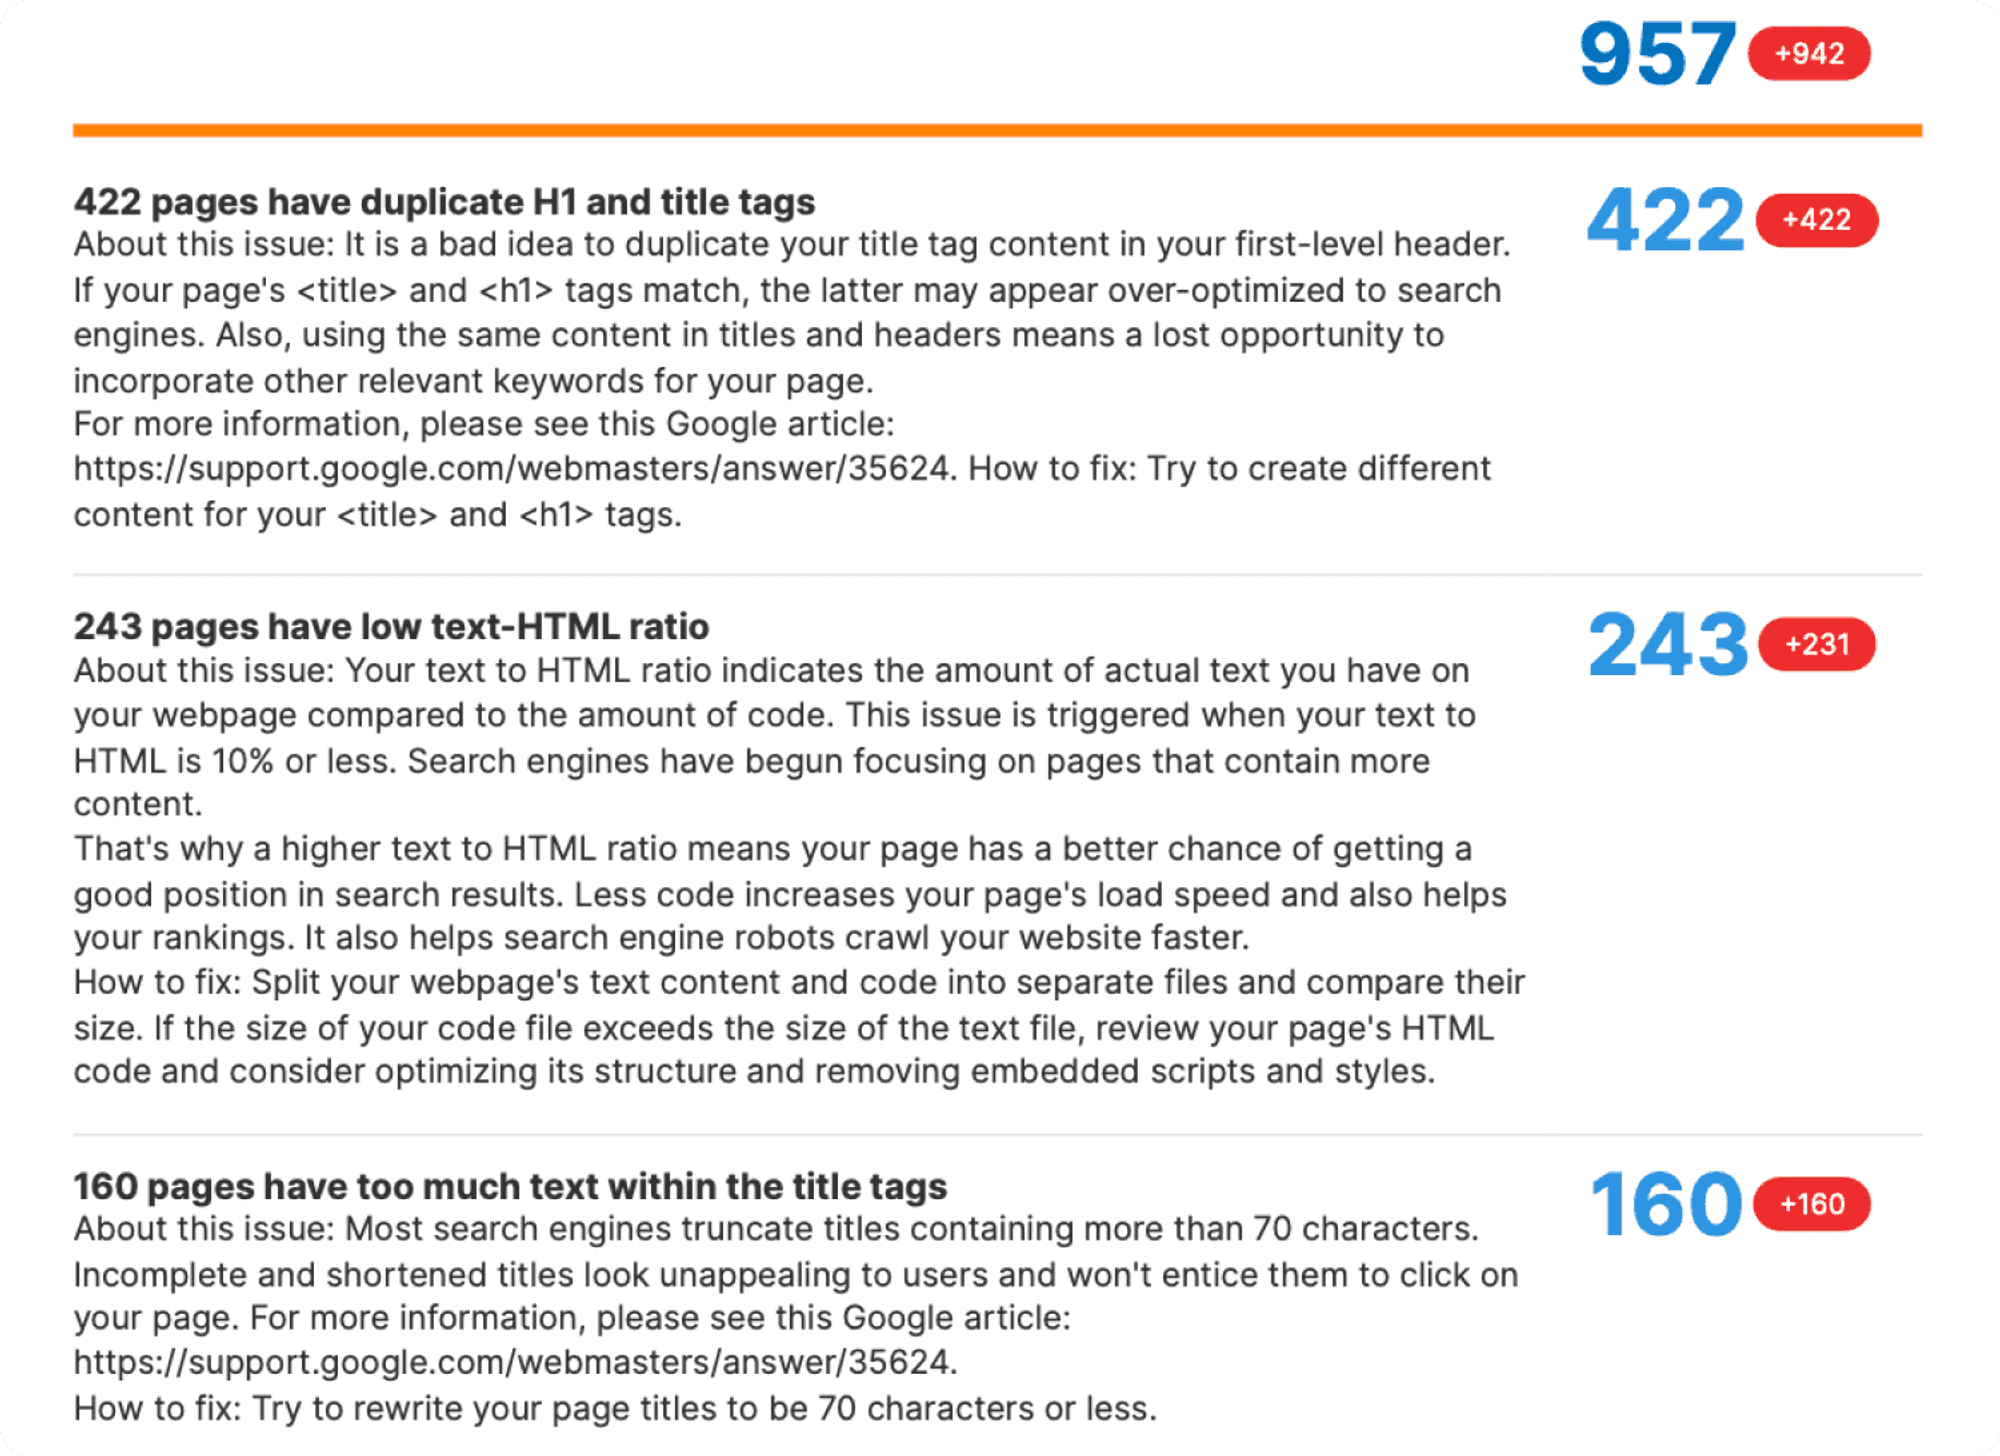
It takes 2 minutes to audit a site with paid tools like Ahrefs or Semrush, costs them nothing AND most of it is a waste of time.
Don't fall for it.
Only implement the things that drive impact.
Think about it, Google wants to show the best content to users.
So if your content is great, it’s in Google’s best interest to rank your page. Even if some technical details aren’t on point.
If you ever get a "free SEO audit" from an agency, with 100+ errors, don't be impressed.
It takes 2 minutes to audit a site with paid tools like Ahrefs or Semrush, costs them nothing AND most of it is a waste of time.
Don't fall for it.
Only implement the things that drive impact.
Think about it, Google wants to show the best content to users.
So if your content is great, it’s in Google’s best interest to rank your page. Even if some technical details aren’t on point.
More Resources
Read through the SEO starter guide by Google.
It is gold!
If you want to learn more check out this video by Ethan Smith.
Here is the link to his presentation.
Read through the SEO starter guide by Google.
It is gold!
If you want to learn more check out this video by Ethan Smith.
Here is the link to his presentation.
Read through the SEO starter guide by Google.
It is gold!
If you want to learn more check out this video by Ethan Smith.
Here is the link to his presentation.
Course Chapters

Copyright © 2024 Profaile GmbH. All rights reserved.
Copyright © 2024 Profaile GmbH. All rights reserved.
Copyright © 2024 Profaile GmbH. All rights reserved.